The original Salisbury Jug?

An old friend, let’s call him Helmut the German, for that has become his name, is on a cycling tour of the UK. He’s been keeping us up to date with posts on his blog, and this morning posted his latest report on his day in Salisbury.

Helmut’s photo of Salisbury Jacks

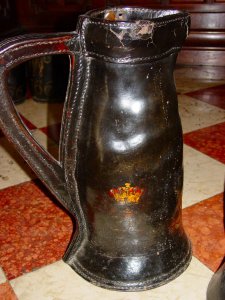
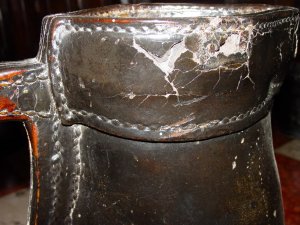
One photo shows a collection of leather drinking vessels of various dates probably from the second quarter of the seventeenth century onwards. On close inspection, the bombard to the right seems to have been the prototype for the Salisbury Jug I wrote about a short while ago. It looks to be about two gallons, so is roughly eight times larger than the ceramic copy. The one to the back left is contemporary with the bombard and should be a quart (1200ml) based on both the minimum legal measure at the time and the scale of the reflections in the photo. The newer 18th century jacks in the foreground would then be about pint each, which again is right for that period.

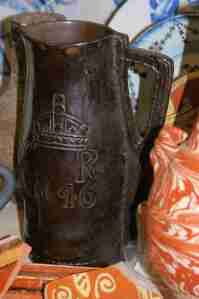
Victorian period ceramic Salisbury Leather Jug.

Supporting my hunch about the potter moving the decoration to the side, on the leather version the crown and letter “R” are clearly seen on the front (opposite the handle) in the photo and I think I can see the numbers “46” below that. I had been expecting the decoration to be painted on, but the photo shows that it is incised, much like on the ceramic copy.

Black jacks, part 2

So you want to make a black jack… You’ll neet to get the right materials, some equipment and the usual leather working tools. I’ll briefly touch on each of these before going on to discuss manufacture techniques. If you want to open part 1 in another window, you can cross-check the summary of requirements at the bottom to keep me honest.

Materials

I generally make my jacks and bottels from harness butt. It’s about 3.6 to 5mm thick, has a smooth matte surface and moulds exceptionally well. You need a thickish leather that moulds well and hasn’t been heat-treated.

You’ll need some dye, black is traditional. I’ve used a spirit based leather dye in the past, but am considering an iron-based dye for next time. This dye is chemically very similar to the ink Baker mentions, you could use ink, but avoid India inks as they are carbon in suspension and will shed black over everything.

Linen is the best thread to use, being accurate and strong. I have a 23km reel of fine thread I got on e-Bay from a mill that was closing down for not very much money. It is very fine, so I have to use six-ply on jacks. No, you can’t have some, get your own. Make sure you get enough, you’ll probably need to make two-ply if you use the thread that comes on cards in haberdasher or on reels from leather stores. You do that by cutting two equal lengths of thread, give them a moderate coat of wax and then roll them in one direction until they become a single thread. If the thread kinks or forms loops, you’re rolling them too tightly.

Which brings me on to the next item – wax. You can use pure beeswax quite happily, but if you are feeling adventurous, try coad, a 2:1 to 4:1 mixture of pitch and beeswax. The proportions are best worked out by experimentation, beeswax here is fairly soft for most of the year (and occasionally a sad-looking puddle) so I need more pitch. In Europe and North America, more beeswax may be beneficial. Have a look at this thread, but don’t get scared away by the technical detail some of the correspondents go in to. Plain wax works fine.

Equipment

Most of the equipment I use is in this photo below. The only thing missing is a short length of 90mm PVC storm water pipe that takes the place of the outer ring in Baker’s figure 72. If you have a tame blacksmith, by all means get a pair of iron rings made instead and earn bonus points for being hard-core.

Almost everything you need to make a jack.

Clockwise from the front left corner: there’s the wooden disk, 80mm diameter, 20mm thick that I use with the drain pipe as a substitute for Mr Baker’s paired iron rings; the hinged stretching frame, made from 100 x 50mm radiata pine  recovered from an old kitchen cabinet (the nine screws in the bottom right corner reinforce a split that runs along the grain); the mould/core turned up for me by a friendly woodturner from an old kauri pine table leg at the cost of approximately 3 beers and; the removable piece for moulding the spout made from offcuts of radiata.

Showing the way the frame boards are cut to match the mould core. ‘Scuse fingers.

Tools

You’ll need the usual implements of terror: harness needles or pig bristles if you can get them; a strong, sharp awl as some places are nearly 20mm thick; a sharp knife with a good point for cutting out the pattern and the handle – I use a Stanley knife/box cutter because I don’t yet have a half-moon knife and; a butter knife or embossing tool if you are going to do the parallel lines around the spout. You may also want some stamps if you are doing any stamped decoration.

Construction

Cutting the leather

Cut the requisite two pieces of leather. The main body piece should rectangular with the short side approximate the desired height of the finished jack and the long side equal to the circumference at the smallest diameter of the mould (near the top on mine) plus the width of the handle on each side, plus a bit extra for banging nails into. The long axis should lie across the hide to gain maximum advantage from the natural stretch of the leather. The other piece is roughly circular, the diameter of the wooden disk, plus at least twice the height. A bit more doesn’t hurt as it will be trimmed to shape later. I tend to hack these out of the odd sticky-out bits near the edge of the hide.

I didn’t do any photos of the cut-out bits, you know what a rectangle of leather looks like and should be able to infer from the later photos anyway.

Forming the base

Soak the leather, then place the wooden disk against the skin side in approximately the middle of the piece and then push the entire assembly into the end of the bit of drain pipe flesh side first. The pipe should compress the leather against the wooden disk, and if the sizes are right, result in a nice sharp transition. This is much the same method as used to form the ends of costrels, but a little easier as you are using a commercially available outer mould. Set aside to dry, the time will vary depending on where you live. If you live somewhere really cold or damp, put it in the oven at it’s lowest temperature for a couple of hours but take care it never approaches 70° C / 155° F as you don’t want the leather to harden. Again, no photos so have a look at the costrel end ones and imagine something similar… but round.

Forming the body

Watch carefully. Because there is some space at the top and bottom, draw some lines on the frame to help align the leather. Wet the leather and nail it in position on the back edge of the frame. This stops the leather stretching unevenly around the nails. If it’s too loose, you can always pry it off and re-nail it a little tighter as I had to on my first one.
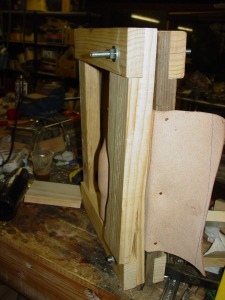
The leather nailed in place and tightened around the former. I left the leather far too long on this first one, the second one was done with a shorter rectangle. You can see the crack in the frame opening up.

Then stuff the core in the middle and clamp, the threaded rods help the frame keep in alignment when tightening, but are probably unnecessary. Once that’s clamped properly and assumed the correct shape, squeeze the spout bit in. I found doing the two parallel lines around the spout with the back of the obligatory butter knife really worked the leather tightly in around the spout. Do any other tooling or stamping at this point.

The spout piece in place.

Once dry, remove loosen the bolts or unclamp and remove the nails and feel smug.

Dried, pried off and feeling smug.

How are we going against Baker’s list? I’ve used two pieces of leather, formed it on a wooden core with a removable spout piece and shaped the base using two iron ring substitutes. We did a little embossing around the spout while still on the core, although its a bit awkward working around the frame. So far so good.

Trimming

Pop the base out of the pipe, keeping the bit of wood inside. Trim the base to between 15 and 20mm high.

Take the body and cut out the handle, cut a couple of handle copies out of the waste. This one has a mid-17th century handle shape consistent with the double embossed lines around the spout.

All the bits cut out. The reinforcing pieces are cut from the waste. I suspect this is the stage Baker based his schematic on.

I’m cheating again. The photo below is from my second attempt at making a jack this way because my first was way too long and had more waste than I was aiming for. Let’s have a quick list check again: started with a single larger piece for the body, cut to shape and cut the reinforcing bits from the waste.

This is the waste from my second attempt. I doubt I could do much better starting from a rectangle.

You’ll need a welt the same height as the base with the length the same as the circumference as the base. I made mine up from several pieces cut from the bigger bits of scrap, beveling the ends so a single stitch could hold both in place. You could also use a separate strip, but I’m trying to stay within the confines of Mr Baker’s list. Now it’s time to dye all the parts (I’ve already done the base in the photo above) and let them dry.

Assembly

There’s not much to tell here, do the back seam first, followed by the seam that runs along the outside of the handle. The closer the back seam is to the crease between the handle and body, the stronger and easier to waterproof the jack will be. Then sew around the inside of the handle, and once done, cut out the centre of the handle.

Back seams done, handle cut and the base sewn in. I haven’t re-dyed the cut edges yet.

Pay close attention to the stitch spacing, and make sure the stitches are perpendicular to the surface. You also need to make sure they are in a straight line on both sides of the handle or it will look ugly and can lead to stitches being cut when you cut out the eye of the handle.

View from underneath showing base, welt and the intersection with the handle reinforcing parts.

Force in the base and welt and secure with two rows of stitching. That’s pretty much it. Do any trimming you need to tidy the edges, then re-dye. Neaten the cut edges by dampening and rubbing with a plastic slicker or piece of bone. I like using lamb bones as they bring the edge to a high gloss.

I usually do the painting at this point, but you can wait until after pitching if you’re worried that the heat will affect the paint.

Sealing

I have a hoard of black brewers’ pitch that I use for bombards and jacks.  I generally cover the outside with kitchen foil so any drops of pitch don’t mar the outside or stop the adhesion of the paint. Heat the pitch, pour in, slosh about so everything is covered and pour back in to the pitch pot again. The pitch should be hot enough to be runny, but not smoking. You can build up a good even coating with multiple coats if the first seems too thin. If blisters or runs are causing you problems, a couple of hours back in the oven at 60° C should help even out the surface although it will make everything slump towards the base slightly. Turn the oven off and allow to cool before removing the jack so you don’t craze the pitch. This step simulates the technique of hanging jacks in the smoke of a fire that Waterer talks about in Leather in Life Art and Industry.

Some people prefer to mix wax with the pitch to make it flow or to extend it. That doesn’t work for me as the pitch is soft enough as it is. Others use Envirotex or other food grade epoxy as some jurisdictions consider pitch to be a carcinogen. I’ll leave it up to you, but I think the risk is acceptably low as I use these less than once per month and am exposed to other carcinogens such as plasticisers on a far more regular basis.

Finishing

Varnish over any painting and then give the entire beast a good rub down with a wax furniture polish (or sealing wax dissolved in alcohol).

Summary

That more or less concludes the making of the jack within Mr Baker’s constraints. We’ve formed the base from a single piece of leather, worked over a round former. The body was cut as a single piece of leather, and after moulding around a wooden core with a removable spout piece, the waste around the handle was cut off and made into the reinforcing pieces. Embossing took place while still on the block and the handle wasn’t finished until after the stitching was complete.

I feel I have achieved all the self-imposed requirements based on Baker. My only additional step to those in the book was using a stretching frame. Other more skilled artisans than I may be able to mould a jack around a core with their bare hands, but I find it essential to compensate for my shortcomings and helpful in an early modern period style of mass-production.

I like to kid myself that if my methods approach the historical methods used to do something, my mistakes will resemble their mistakes. Here’s a picture of what uneven stitch tension did to one of my jacks, and to a seventeenth century one in the MoL collection.

This is what uneven tension did for me.

Similar problems in the 17th century. Sorry about the flash. For more information, see the MoL record.

Here’s two I prepared earlier. The one on the right is my first attempt.

Black jacks part 1

I had planned to do this as a single post, but I’ve changed my mind as it would be too big. This first post will present the evidence and the second will show how I’ve made my jacks and will discuss some of the difficulties and some things I’ve found. From my point of view, jacks and bombards are the pinacle of leather vessels, there’s a purpose and elegance of form that isn’t so apparent in the other containers.

Oliver Baker, a gentleman collector writing in the late 19th century, appears to have interviewed craftsmen who, if they didn’t make leather jacks, saw them being made in their youth. He wrote a detailed account of the production, pulling it from publication as he was worried that he would enable the collectors’ market to be flooded with good copies rather than the poor work he railed about (many his signs of a counterfeit jack feature on the rubbish peddled at medieval faires and more worryingly, by English Heritage at their stores).

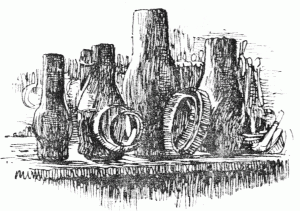
Many people therefore claim that there’s nothing about manufacture in Baker’s work, but if you look in the earlier chapters and the section he did print on making jacks, you can pick up almost the complete story. It all revolves around this picture on p188.

Baker Figure 72

Fig. 72. Wooden moulds and rings for making jacks at Messrs. Merrywether’s, Greenwich. (Each core has an associated pair of rings and one ring of the pair is smaller than the other.)

I’ll quote the sections of Baker that hint at the technique or manufacture or indicate decoration methods:

[p76] …there are incised lines on the spout portion arranged in a pattern not unusual in jacks of the 17th century.

[p108] JACKS WITH LIDS.
The jack in its usual sphere did not require a lid, and was seldom made with one. The lid is an addition and not part of the original vessel in the majority of those I have examined. The only instance I have found from old documents occurs in the inventory of Sir John Gage’s goods in 1556: “Item iij newe blacke jackes of lether wth cov’s, for the hawle. Item iij other old black jackes wth oute covers for the hawle.” (Sussex Archaeo. Coll., p. 125.)

[p122] This smaller one is of unusual shape, as, instead of the ordinary circular base, it is longer from front to back than from side to side, measuring 9 inches by 8. This is very unusual, as jacks are almost invariably circular in plan, the base being round and the top shaped for pouring from, according to the fashion of the period or the taste and fancy of the maker.

  [p132] There can be no doubt that the ornate handles of these smaller jacks must have been stitched when their shape was only roughly developed, and that they were cut into shape afterwards. The lines of stitching are outlined with incisions previously made in the leather as a guide; and after being stitched the ornamental contours were cut out with a sharp knife as tracery is cut with a fretsaw, as close to the threads as was consistent with safety.

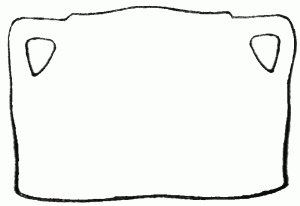
If the complex handles he’s talking about are made the same way as the simple handles, this last statement is inconsistent with figure 70 on page 188. The figure shows the shape of the leather for a jack with the handle already cut. I take this a schematic diagram of how the jack would look, if it were laid out flat again after forming and stitching. I also reserve the right to be wrong on this point, but can’t see why there’d be different ways of cutting the handle depending on the complexity of the design when it results in a better finish even on the simple triangular handles. Cutting the handle before shaping would result in the handles being stretched excessively during the moulding stage.

Baker Figure 70

Fig. 70. Shape of the leather before being made in to a jack. (I think this is one of those omissions made to confound copyists. Note that he doesn’t say “before moulding”.)

[p179] There was, however, in 1891, at the Hospital of St. Cross, near Winchester … an actual eye-witness of the making of leathern jacks. One of the Brethren, who was once connected with the leather trade, remembered to have seen in his youth an order executed for four jacks for Winchester College. …

The Brother of St. Cross also remembered in Kings-gate Street, not more than two hundred yards from the College, the shoe-maker’s shop at a house which [p180] is still standing, where more than sixty years before he saw four leather jacks made. The particulars he gave me of the process have been of considerable interest in supplementing the knowledge obtained from a study of the vessels themselves, as to the manner in which they were made, and I had written for this chapter a long and detailed account of the method pursued. It seems, however, desirable not to print it, as the value of old jacks and bottles having increased, the temptation to make imitation ones has become greater within recent vears and I have decided to omit most of the details.

[p182] THE MAKING OF A BLACK JACK.
In making the leather pot or black jack only two pieces of leather were cut from the hide. The strips for thickening the seams would, of course, be taken from the scrap. The larger of the two was so cut as to include the handle and the body of the pot in the same piece (as shown at Fig. 70, which are given to scale from actual examples), the shape depending on the design of the jack. A new jack was pitched on the inside and blackened on the outside. This lining of pitch kept the leather from contact with the liquor, and prevented it penetrating and softening the leather. …

[p183] The jacks which the Brother of St. Cross remembered to have seen made early in the 19th century were blackened by being painted over with ink, and finished with a polish of black sealing-wax dissolved in spirits of wine. …

It is an interesting fact that at Messrs. Merryweather’s factory at Greenwich black jacks continued to be made down to the middle of the 19th century, and still more interesting that the great wooden blocks and rings on which they were modelled are still in existence. In one old corner of what is now a vast establishment for the making of fire-engines and kindred appliances, are a number of odd looking wooden objects much like big skittles upside down. (Fig. 72.) These cores or blocks appear to be of considerable age, and are certainly more than a century old. As can be seen by the sketch they are not like jacks in shape, because their necks are unduly prolonged and the portion which modelled the vessel’s spout is a separate piece of wood. This arrangement enabled the wooden core to be more easily withdrawn after the body of the jack had been worked in a damp condition into the required shape and dried on the block. The bottoms were moulded separately on iron rings (a number of which have been preserved with the blocks) and after drying were stitched into place.

[p184] MAKERS’ MARKS.
… Initials are very commonly found on bottles, and not seldom on jacks. When impressed in the leather with a stamp they may be regarded as those of the maker, as it could only be done successfully when the leather was wet and supported by the wooden block inside…

[p188] OF SPURIOUS JACKS AND BOTTLES.
… Perhaps the form most usually taken by these fraudulent vessels is that of a plain mug of leather. It sells as a black jack, but requires no great amount of time or expense to produce. The varied contour of a real one would require patience and skill to copy, whereas a mug with straight sides is soon turned out. In such false pots the bottom is often flush with the sides, an invariable sign of a sham. The genuine jack had always a deeply-recessed bottom, (the best way to make it water-tight), as the seams projected considerably and the bottom (always being liable to “swag” with the weight of the contents), might bulge so as to wear through or prevent the pot standing. Another point to remember is that all jacks with handles stitched on are shams. In genuine ones the handles are always a part of the same piece of leather as the body of the vessel and continuous with it. This is practically invariable…

My apologies for quoting huge slabs of text but I wanted to make sure each remark was in context. To save an equal amount of text, I’ll paraphrase Baker’s comments about the shape of the handles being a useful guide to dating. Generally, up to the middle of the seventeenth century, handles are triangular in shape and start with a small step down from the top of the jack. Later jacks have a more curved handle further down the side.

Any method of production must take all of these requirements into account. The base must be formed from a single piece of leather, worked over a round former in some fashion. The body must be made cut as a single piece of leather, and at some point in the process before stitching begins, the waste around the handle must be cut off and made into the reinforcing pieces. The body should be shaped around a wooden core with a removable piece for forming the spout. Stamping or carving should happen while still on the block and finally, the handle should not be finished until after the stitching is complete. Even with all this, Baker was comfortable he’d left enough information out to make it impossible to make good fakes. Given Baker’s omissions, I feel it is fair to add extra steps or equipment within the limits of the technology available at the time of the one you’re making.

The second part in a week or two (or three)  is about my attempt to fill in the missing detail. It is entirely conjecture, and draws heavily on the work done by Greg Stapleton of the Royal Ontario Museum. In the meantime, feel free to comment, point out logical errors or posit your own theories.

Jacks at Warwick

That’s not eighteenth century leatherwork

Glenda and I had planned to spend half a day in Warwick Castle. We’d been told that it was expensive but as entry was covered on the Great British Heritage Pass, we didn’t have to worry about the cost.

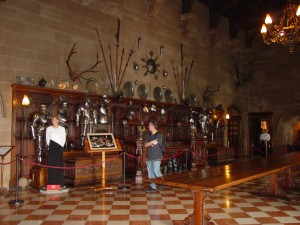
We entered the castle about 5 minutes before a guided tour started, so joined the crowd and waited. The tour started in the Chapel, wandered down to the dining room, then went back to the Great Hall. We sashayed past the wax Lady Di, everyone else started to admire the sideboard made for Vickie and Albert.  Not me. There on the floor were two of the largest bombards I’d ever seen. Yum. Glenda dragged me along with the group as we investigated the wing of the castle [knowing we could go back again – honest! G.] At the conclusion we collared the guide and played “20 Questions”. She humoured me for nearly 20 minutes, then ducked off and found a copy of the guide manual.


Warwick Castle

The Great Hall of Warwick Castle. From the left: A wax Lady Di; the real Wayne (or possibly the other way around) looking at rivet patterns on 17th century pikemen’s armour and; on the floor, several leather vessels they didn’t know where else to put.

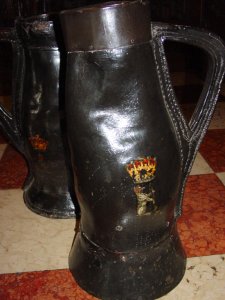
Until the late 17th century jacks and bombards as a rule have triangular shaped handles attaching at the top of the body and are flat near the top of the vessel and have a smaller mouth. After the 17th century, the handles become more curved and attach lower down the body. The mouth of the vessel is wider from the 18th century onwards. These two show reinforcing attached to the top, one in leather and the other in metal (possibly pewter), probably done at different times. There was some evidence of a metal handle being added to the top of leather reinforced one at some stage, but it has long gone. The leather was about 3mm thick, with three additional layers in the handle and one gasket strip in the base. Stitching is heavy linen, six stitches to the inch. Height is about 20”; diameter at the neck is 5” and 12” at the base.

The guide’s manual states that the bombards belonged to the Grevilles, who were made Earls of Warwick in 1759. Based on the Greville crest being shown with a coronet, they had decided that the bombards were made for the occasion and therefore dated to 1759. I pointed out the coronet was in obviously newer paint to the crest and stylistically, these bombards belong to the 17th century! Unfortunately, no one could provide any more help but they did recommend other parts of the castle that we may be interested in.

Once home, I dug out my copy of Baker, just in case the author had made any mention of the bombards. On page 120, I found what I was looking for. Following a visit some time prior to 1921, Baker wrote:

Dsc02134a

Dsc02140a 

The smaller bombard. Note how the coronet is in relatively good condition when compared with the device below which is mostly illegible. The leather bucket in the background bears the date 1766. The larger bombard. The Warwick badge is in similar condition to the coronet. This is consistent with both being applied in 1759, the year the Grevilles were made earls of Warwick.

“In Warwick Castle, … there are two huge bombards of unusual shape, huge size and considerable age. They are painted with arms and crests, but are somewhat injured by wear and tear. … The smaller one is 19 inches high. It has been strengthened by a deep band of leather at the top and has a thick brass handle added to enable it to be carried bucket-wise. … The larger jack is of a peculiar shape, tapering from a broad and sloping base to an unusually narrow mouth. It has been repaired by the addition of wide bands of metal apparently pewter, at the top and bottom, attached with rivets. This jack is very tall, being 21 inches high, 32 inches round the base and only 16½ round the mouth. On the front an earl’s coronet surmounted by a swan is painted, on each side is a coronet with the Warwick badge, the bear and ragged staff. The general character of the jacks suggests that they belong to the later half of the 17th century. The fact that the shorter jack has a brass handle across the top, on which is engraved the name of the man who placed it there (Spicer 1823, maker), shows that in the 19th century it was still being used.”


Dsc02143a

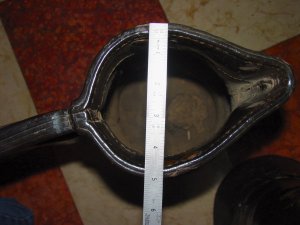
Top view of the smaller bombard. The rule shows 3mm leather for the body, a single 4mm gasket strip down the back seam and four layers in the handle. The repair around the mouth is in 1mm leather.

Dsc02137a

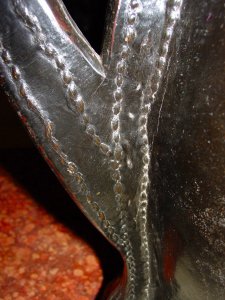
Intersection of the handle and body on the smaller bombard. Note the irregularity in the stitch lines. The angle of the cut on the inside of the handle leads me to believe that the handle is cut after the stitching was done.


Dsc02144a

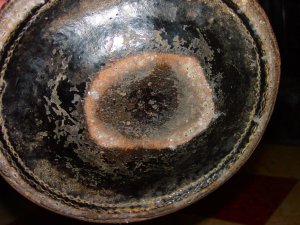
The base of the smaller bombard. Two rows of parallel stitches are shown, about 4mm apart at a pitch of 6 stitches to the inch.

Dsc02138a

Detail of the neck reinforcement on the smaller bombard. The larger one has a metal collar of later date.


References:

Baker, O., Black Jacks and Leather Bottells, privately printed for W.J. Fieldhouse, Cheltenham Spa 1921

Warwick Castle, http://www.warwick-castle.co.uk/, January 2004

Painted finishes

This is a topic I don’t think anyone’s covered particularly well, so I’m going to have a crack at it. A lot of extant leatherwork from the early medieval period through to the modern period exhibits traces and in some cases, complete painted decoration. Some good examples are the Stonyhurst Gospels (http://en.wikipedia.org/wiki/Stonyhurst_Gospel), the saex scabards at Jorvic and the Yorkshire Museum and the leather jacks in Warwick Castle. Looking through surviving Tudor and Stuart leatherwork that’s in original condition, almost all buckets, bombards and jacks have at least the date painted on them.

Paints

Appropriate paints include tempera, gouache and oils. The selection of paint  depends on the period being represented by the object. Tempera predates Egypt, and was still commonly used until superceded in about 1500. Gouache paints were in use in the early 1400s in mainland Europe and probably migrated into the UK shortly after. The name originally applied to a completely different paint, taking it’s modern form in the 19th century.

Contrary to many claims about a much later date of invention, Theophilus, writing in the early12th century disussed the preparation and use of oil paints using linseed oil as the medium and rosin as the binder (Book 1, Chapter 25). I suspect the Warwick jacks are crested with an oil-based paint. More relevant to us here, he also gave a couple of recipes for a varnish made from linseed and rosin (Book 1, Chapter 20).

Each of the types of paint have their pros and cons, oil paints are easy to use and waterproof when dry, but dry slowly and continue to oxidise and darken as they age. You’ll need to use at least three coats to get any colour density. Gouaches are better at covering than oils, and dry quickly, but aren’t waterproof when dry. I usually thin with a few drops of gum arabic to improve water resistance and then compensate by doing two coats. Tempera is hard to get unless you grind and mix your own, it has most of the benefits of gouache but is often fugitive.

Purists may skip this next section while we discuss modern paints. Art quality acrylics work wonderfully over large areas or in places where the object is likely to get wet: I use acrylics for objects used by kids due to the wearing properties and water resistance. The bigest benefit is flexibility – acrylics can be used on soft items or things that have a bit of spring without flaking. Acrylics aren’t capable of flowing the way gouaches and oils do, so don’t suit my painting style. They also tend to bead when applied in fine lines, so can’t achieve the same clarity as gouache. 

Gel inks  provide good coverage and can be used to provide very fine lines, so can be used to compensate for the shortcomings of acrylics. You have to have a good eye for colour to be able to match the acrylic paint with the gel. These come in pen form with a steel rolling ball, so can be used for fine lines on knotwork that would have originally been done with a steel nib or crow quill. The black comes in handy for correcting the bits where you go slightly outside the lines.

Modern enamels are a pigment in a synthetic oil base. I’ve never tried them on leather, if you have, let me know how they go. I can’t see any reason why they wouldn’t work, but may be a bit brittle on flexible objects.

Metal foils and leaf are a great way of highlighting detail. Use the same methods that you would for applying leaf to parchment.

Layout/Transfer

My sketching tends to be fussy and not suited to easily transfer to leather. For these things, I do my layouts by finding an image on the Internet or in books, bung it in a word processor and then put any text required around it. Here’s one I prepared earlier.

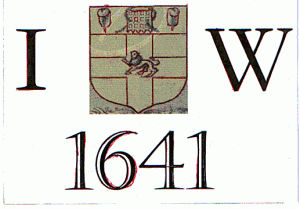
Design for James' jack

Design for James' jack

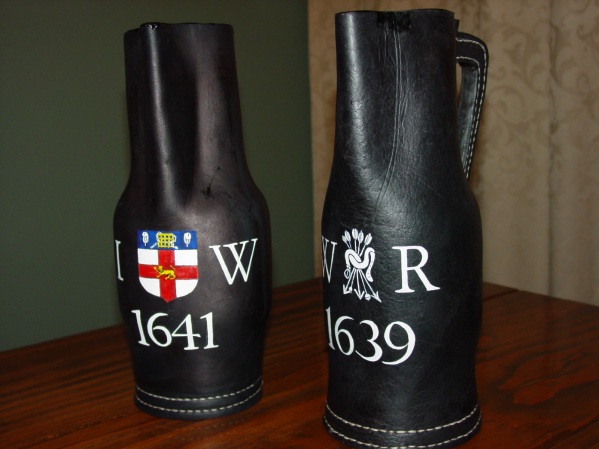
This design was a commission for a jack for James’ birthday. The arms in the were taken from a larger design done by Wendel Hollar for the Honorable Artillery Company in 1643. I’ve removed the supporters, the crest and the mantling. The arms are considerably older than this, but it does show the correct form during the period in question. The initials IW are used as the letter I was commonly used in place of J in the early modern period. The year 1641 is arbitrary, but as James is younger than me, it seemed appropriate that his jack showed a newer date than mine. Paint colours come from a slightly later colour print. 

The design was printed and transfered to the leather using one of a few different techniques. If it’s a flat design painted directly on to the finished leather, I cheat and transfer the design with yellow or white “carbon” paper available from larger haberdashers – that’s why the red pen outline is on the design above.

Left: IW 1641, with the arms of the HAC, Right: WR 1639, with the arms of the Order of Prince Arthur, a company of archers

Left: IW 1641, with the arms of the HAC, Right: WR 1639, with the arms of the Order of Prince Arthur, a company of archers

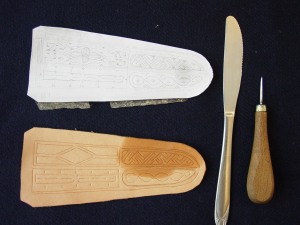
 For embossed or chased designs I do the work before dyeing the leather by poking small holes along the lines with a needle or awl and after securing to the leather, rub powered charcoal or chalk through the holes, then remove the paper and join the dots before embossing, often using the back of a butter knife to start. Once the relief work is done, the leather is dyed and sewn and then painted.

The pattern and leather with the linear elements of the design embossed.

 I didn’t end up painting the one above, but the principle is the same. Try to avoid handling the area you’ll be painting, particularly if using water based paint as the oil from your fingers will cause the paint to bead and cover unevenly.

Painting

In a manner somewhat reminiscient of the Monty Python Blue Peter sketch, now paint the design. It takes some practice to get paint to flow properly on leather, particularly if the grain is particularly deep. Pick something easy to start off with and don’t be afraid to wash it all off, let it dry and have another go.

Finishing

Again, I look to Theophilus and varnish over the painted design. If I’m using gouache, I’ll use three or four coats of varnish to improve the water resistance and then a good coat of bees wax polish. The jack on the right in the top photo has been in use for nearly 10 years, the only time I had problems with the paint running was last Easter when it was used in a re-enactment tavern in a river valley where the humidity was always over 90%. It was continually wet for four days straight and the bottoms of the serifs started to bleed on the evening of the last day.

See my earlier “Care and Feeding” for more tips on maintaining your painted leather for a good working life.

Examples

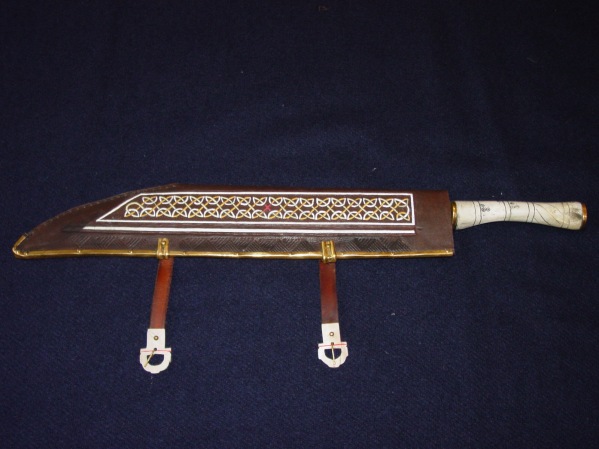
Saex scabbard, loosely based on one from Jorvik. The original has much coarser knotwork but still shows paint in the same colours. The bone buckles and hilt came from a lamb roast.

Saex scabbard, loosely based on one from Jorvik. The original has much coarser knotwork but still shows paint in the same colours. Gouache on the leather, the bone has a black paste worked into the groves. The bone buckles and hilt came from a lamb roast.

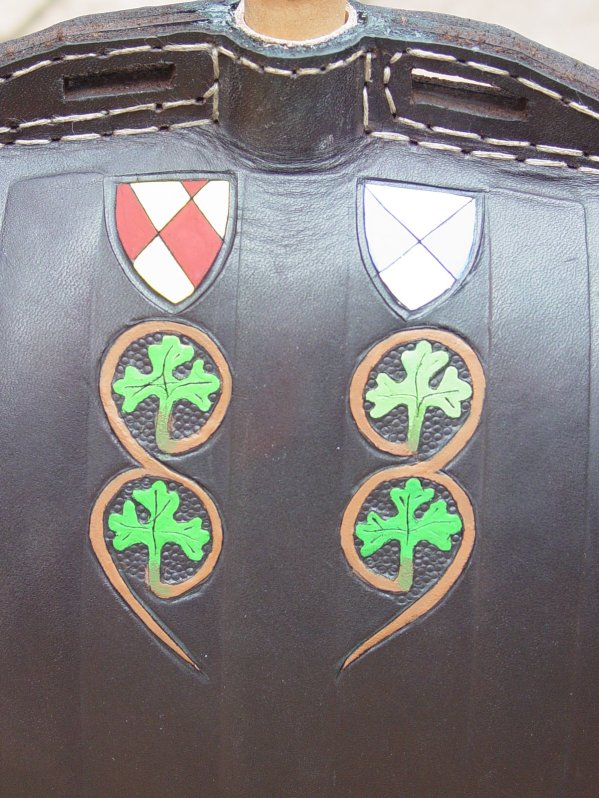
Costrel neck, in the style of one from the Mary Rose, 1545. It was to have been a copy, but I got the length wrong and had to use different shaped ends to compensate.

Costrel neck, in the style of one from the Mary Rose, 1545. It was to have been a copy, but I got the length wrong and had to use different shaped ends to compensate. Gouache on leather.

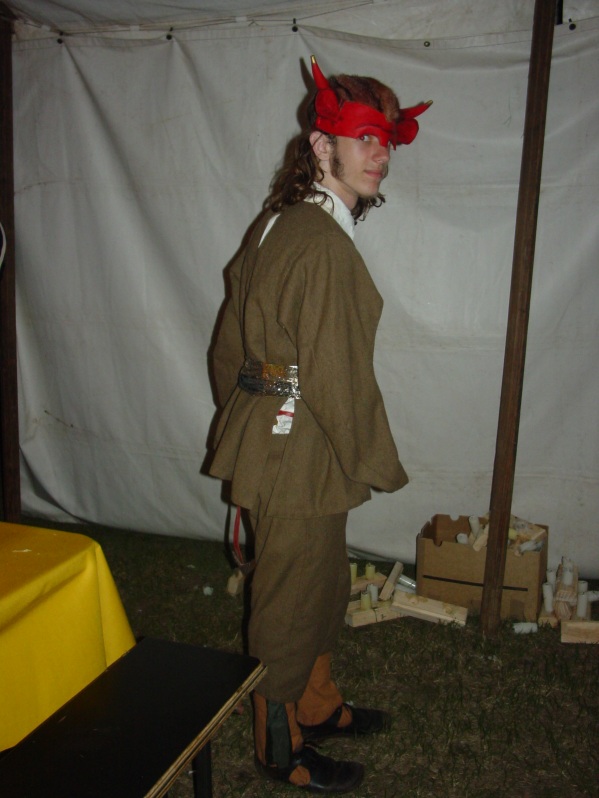
Lincoln Imp mask and tail based on the imps around Lincoln Catherdral. Moulded leather mask and horns, embossed ears and tail. The hair is an old fur stole. Acrylic paint and gold leaf.

Lincoln Imp mask and tail based on the imps around Lincoln Catherdral. Moulded leather mask and horns, embossed ears and tail. The hair is an old fur stole. Acrylic paint and gold leaf.


References

Baker, O.,  BLACK JACKS AND LEATHER BOTTELLS: Being some account of Leather Drinking Vessels in England and incidentally of other Ancient Vessels,  England 1921

Preservation Brief 28 – Painting Historic Interiors, http://www.nps.gov/hps/TPS/briefs/brief28.htm, accessed 2 October 2009

Theophilus, On Diverse Arts, http://www.fordham.edu/halsall/source/theophilus.html, accessed 2 October 2009

Paint