I had planned to do this as a single post, but I’ve changed my mind as it would be too big. This first post will present the evidence and the second will show how I’ve made my jacks and will discuss some of the difficulties and some things I’ve found. From my point of view, jacks and bombards are the pinacle of leather vessels, there’s a purpose and elegance of form that isn’t so apparent in the other containers.
Oliver Baker, a gentleman collector writing in the late 19th century, appears to have interviewed craftsmen who, if they didn’t make leather jacks, saw them being made in their youth. He wrote a detailed account of the production, pulling it from publication as he was worried that he would enable the collectors’ market to be flooded with good copies rather than the poor work he railed about (many his signs of a counterfeit jack feature on the rubbish peddled at medieval faires and more worryingly, by English Heritage at their stores).
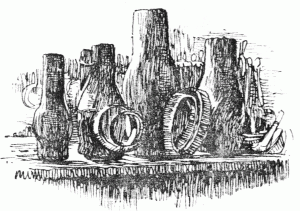
Many people therefore claim that there’s nothing about manufacture in Baker’s work, but if you look in the earlier chapters and the section he did print on making jacks, you can pick up almost the complete story. It all revolves around this picture on p188.

Fig. 72. Wooden moulds and rings for making jacks at Messrs. Merrywether’s, Greenwich. (Each core has an associated pair of rings and one ring of the pair is smaller than the other.)
I’ll quote the sections of Baker that hint at the technique or manufacture or indicate decoration methods:
[p76] …there are incised lines on the spout portion arranged in a pattern not unusual in jacks of the 17th century.
[p108] JACKS WITH LIDS.
The jack in its usual sphere did not require a lid, and was seldom made with one. The lid is an addition and not part of the original vessel in the majority of those I have examined. The only instance I have found from old documents occurs in the inventory of Sir John Gage’s goods in 1556: “Item iij newe blacke jackes of lether wth cov’s, for the hawle. Item iij other old black jackes wth oute covers for the hawle.” (Sussex Archaeo. Coll., p. 125.)
[p122] This smaller one is of unusual shape, as, instead of the ordinary circular base, it is longer from front to back than from side to side, measuring 9 inches by 8. This is very unusual, as jacks are almost invariably circular in plan, the base being round and the top shaped for pouring from, according to the fashion of the period or the taste and fancy of the maker.
[p132] There can be no doubt that the ornate handles of these smaller jacks must have been stitched when their shape was only roughly developed, and that they were cut into shape afterwards. The lines of stitching are outlined with incisions previously made in the leather as a guide; and after being stitched the ornamental contours were cut out with a sharp knife as tracery is cut with a fretsaw, as close to the threads as was consistent with safety.
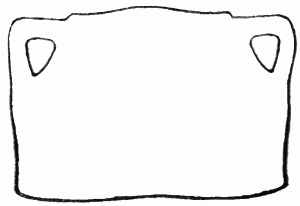
If the complex handles he’s talking about are made the same way as the simple handles, this last statement is inconsistent with figure 70 on page 188. The figure shows the shape of the leather for a jack with the handle already cut. I take this a schematic diagram of how the jack would look, if it were laid out flat again after forming and stitching. I also reserve the right to be wrong on this point, but can’t see why there’d be different ways of cutting the handle depending on the complexity of the design when it results in a better finish even on the simple triangular handles. Cutting the handle before shaping would result in the handles being stretched excessively during the moulding stage.

Fig. 70. Shape of the leather before being made in to a jack. (I think this is one of those omissions made to confound copyists. Note that he doesn’t say “before moulding”.)
[p179] There was, however, in 1891, at the Hospital of St. Cross, near Winchester … an actual eye-witness of the making of leathern jacks. One of the Brethren, who was once connected with the leather trade, remembered to have seen in his youth an order executed for four jacks for Winchester College. …
The Brother of St. Cross also remembered in Kings-gate Street, not more than two hundred yards from the College, the shoe-maker’s shop at a house which [p180] is still standing, where more than sixty years before he saw four leather jacks made. The particulars he gave me of the process have been of considerable interest in supplementing the knowledge obtained from a study of the vessels themselves, as to the manner in which they were made, and I had written for this chapter a long and detailed account of the method pursued. It seems, however, desirable not to print it, as the value of old jacks and bottles having increased, the temptation to make imitation ones has become greater within recent vears and I have decided to omit most of the details.
[p182] THE MAKING OF A BLACK JACK.
In making the leather pot or black jack only two pieces of leather were cut from the hide. The strips for thickening the seams would, of course, be taken from the scrap. The larger of the two was so cut as to include the handle and the body of the pot in the same piece (as shown at Fig. 70, which are given to scale from actual examples), the shape depending on the design of the jack. A new jack was pitched on the inside and blackened on the outside. This lining of pitch kept the leather from contact with the liquor, and prevented it penetrating and softening the leather. …[p183] The jacks which the Brother of St. Cross remembered to have seen made early in the 19th century were blackened by being painted over with ink, and finished with a polish of black sealing-wax dissolved in spirits of wine. …
It is an interesting fact that at Messrs. Merryweather’s factory at Greenwich black jacks continued to be made down to the middle of the 19th century, and still more interesting that the great wooden blocks and rings on which they were modelled are still in existence. In one old corner of what is now a vast establishment for the making of fire-engines and kindred appliances, are a number of odd looking wooden objects much like big skittles upside down. (Fig. 72.) These cores or blocks appear to be of considerable age, and are certainly more than a century old. As can be seen by the sketch they are not like jacks in shape, because their necks are unduly prolonged and the portion which modelled the vessel’s spout is a separate piece of wood. This arrangement enabled the wooden core to be more easily withdrawn after the body of the jack had been worked in a damp condition into the required shape and dried on the block. The bottoms were moulded separately on iron rings (a number of which have been preserved with the blocks) and after drying were stitched into place.
[p184] MAKERS’ MARKS.
… Initials are very commonly found on bottles, and not seldom on jacks. When impressed in the leather with a stamp they may be regarded as those of the maker, as it could only be done successfully when the leather was wet and supported by the wooden block inside…
[p188] OF SPURIOUS JACKS AND BOTTLES.
… Perhaps the form most usually taken by these fraudulent vessels is that of a plain mug of leather. It sells as a black jack, but requires no great amount of time or expense to produce. The varied contour of a real one would require patience and skill to copy, whereas a mug with straight sides is soon turned out. In such false pots the bottom is often flush with the sides, an invariable sign of a sham. The genuine jack had always a deeply-recessed bottom, (the best way to make it water-tight), as the seams projected considerably and the bottom (always being liable to “swag” with the weight of the contents), might bulge so as to wear through or prevent the pot standing. Another point to remember is that all jacks with handles stitched on are shams. In genuine ones the handles are always a part of the same piece of leather as the body of the vessel and continuous with it. This is practically invariable…
My apologies for quoting huge slabs of text but I wanted to make sure each remark was in context. To save an equal amount of text, I’ll paraphrase Baker’s comments about the shape of the handles being a useful guide to dating. Generally, up to the middle of the seventeenth century, handles are triangular in shape and start with a small step down from the top of the jack. Later jacks have a more curved handle further down the side.
Any method of production must take all of these requirements into account. The base must be formed from a single piece of leather, worked over a round former in some fashion. The body must be made cut as a single piece of leather, and at some point in the process before stitching begins, the waste around the handle must be cut off and made into the reinforcing pieces. The body should be shaped around a wooden core with a removable piece for forming the spout. Stamping or carving should happen while still on the block and finally, the handle should not be finished until after the stitching is complete. Even with all this, Baker was comfortable he’d left enough information out to make it impossible to make good fakes. Given Baker’s omissions, I feel it is fair to add extra steps or equipment within the limits of the technology available at the time of the one you’re making.
The second part in a week or two (or three) is about my attempt to fill in the missing detail. It is entirely conjecture, and draws heavily on the work done by Greg Stapleton of the Royal Ontario Museum. In the meantime, feel free to comment, point out logical errors or posit your own theories.


