Late 6-7th century shoes from Sutton Hoo Sf9 Mound 1

If you are on my Facebook list, you’ve seen this post before, about a year ago. It’s a long story, I’d been wearing my old Parliament Street shoes for a few years, hoping nobody noticed that they were 3-600 years more recent than the rest of my gear. I was also having a whinge about not having accurate socks and came to an agreement with Jenny Baker that I’d make her a Rus knife in exchange for a couple of pair or nailbanded socks. The socks arrived, they were a perfect size but so thick my shoes no longer fitted. I’ve passed the old shoes on to Owen, who’d outgrown the ones he’d made when he wore size 5 (which I think have been passed on to Sven or someone).

I found the Sutton Hoo picture in a book while I was looking for something for Glenda, I’ve done some more research and found the embroidery on the toe was most likely done in linen, and that the shoe either had a binding thread, or was cloth lined.

suttonhooSf9m1

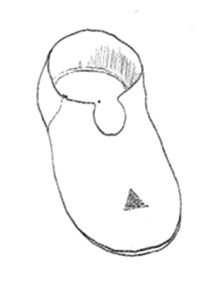
Late 6-7th century shoes from Sutton Hoo Sf9 Mound 1,
reconstruction by Rogers. Found on top of the coffin,
one had folded tablet-woven wickelbands inside.

Construction is virtually identical to shoe (find 756) from Parliament Street in York, so I simply modified the patterns I had for that one. Pete Beatson’s covered the construction nicely in his webpage so I won’t cover it again here. I’m basing the stitching on Parliament Street as that is more accessible than the Sutton Hoo dig report. Sole is attached to the upper with (synthetic) sinew using grain/edge stitches on the sole and grain/flesh on the upper at a 6mm pitch. Side seam and top edge/binding are done with edge/flesh stitches in linen at a 3mm pitch.

Sutton Hoo shoe Sf9 mound 1

All the parts laid out next to the pattern.

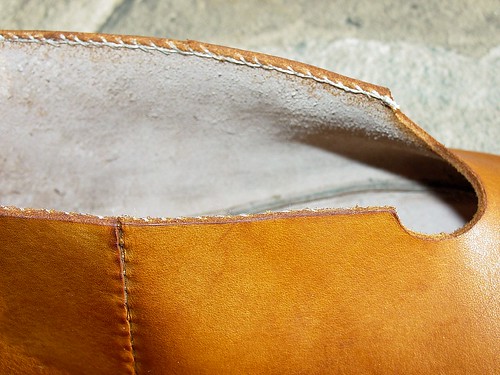
I’ll cut the eye in the front of the shoe when the shoe is complete and I’m happy with the location.

Sutton Hoo shoe Sf9 mound 1

The upper showing the grain/flesh holes for attachment to the sole and the edge/flesh holes for the side seam.

The lasting margin (distance between the stitching and the edge) is the same as the thickness of the sole leather. This makes the seam not intrude into the shoe when it is turned.

Sutton Hoo shoe Sf9 mound 1

The sole showing the edge/flesh holes.

I try to get the awl to go through the full thickness of the corrium (flesh layer) and come out just at the base of the skin when I’m doing these stitches. It gives a more secure attachment as it uses as close to the full thickness of the leather as possible.

Sutton Hoo shoe Sf9 mound 1

The shoe is stitched inside out and then turned when all the seams are finished.

I’m about a third of the way around and am using sinew to attach the sole. The side seam aligns with the instep on the inside of the foot to minimise tension on the seam.  Let’s assume for the purpose of the exercise that I’ve finished one. Yes, I know there’s five more stitches to go on the side seam, but just go along with me for once. Yes, I know I made a mess of  the pattern and the back of the side seam is 3mm higher than the front, I’ll fix that after the stitching is done but before I turn it.

Sutton Hoo shoe Sf9 mound 1

(Allegedly) completed shoe, side seam is at the instep and is done using hand twisted three-ply linen thread. One of the socks responsible for all this nonsense is in the foreground.

Sutton Hoo shoe Sf9 mound 1

Inside of the side seam.

Here you can see how the thread passes through the edge of the leather but never comes through the surface. The missing stitches are to illustrate the way the edges meet and have nothing to do with me breaking a needle, running out of thread or being fed up and wanting to go to bed.

Sutton Hoo shoe Sf9 mound 1

View of the sole, stitched with sinew

The thread goes through the flesh side of the leather and out through the side. It then neatly pierces the upper from one side to the other, then turns around and has another go. Its tied at an arbitrary 15 stitch interval… Or 20… or in one case, 10. When I tie a knot at the end of a length of thread, I thread both free ends onto a needle and pull them both through the nearest hole. A bit of tension then pulls the knot into the hole and the tails get cut off. That way there’s nothing to cause blisters and I look cleverer.

Now all I need to do is turn the shoe the other way out, dye the leather, wax the leather and do the embroidery… and then the other shoe. I’ve managed to get away with shedding only a small amount of blood, mostly from stab injuries.

Sutton Hoo shoe Sf9 mound 1

The opening near the toe cut and the side reshaped to fix the mistake.

Sutton Hoo shoe Sf9 mound 1

Soaking the shoe in barely warm water before turning.

For best results, it has to be really soaking wet, damp leather will stretch, really wet leather won’t as water gets between the fibres and stops them sliding over each other.

Sutton Hoo shoe Sf9 mound 1

Starting the turn.

Sit the shoe in your lap with the heel pointing towards you. Stick both thumbs in at the toe and push it in, then simply keep rolling the leather with your hands…

Sutton Hoo shoe Sf9 mound 1

GGNNNNNNNNHHHHH…!!!

Until you get to this stage where the toe is fully turned and the heel is just about to go. Turn the shoe around and roll the heel in towards the middle of the shoe. The back should pop round with minimal stress on the seams and without stretching. There. That was easy! I don’t know what you were complaining about.
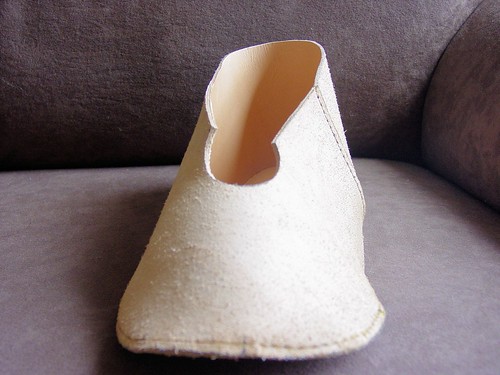
Sutton Hoo shoe Sf9 mound 1

The turned shoe.

Now the shoe is the right way out, just go around the seams and ease any twists or bumps. Make sure it looks like a shoe should and leave it to dry. There’s another step when it is just damp, as you do want to stretch the upper around a bit where it reaches the sole. Dyeing it while still damp also helps level out the dye.

Of course, when you’ve forgotten about it and let it dry completely you need to do things differently. You’ll need some additional equipment: a hammer; an iron shoe-makers last and; a stolen squirty bottle from the ironing.

Sutton Hoo shoe Sf9 mound 1

The implements.

You could use a bent piece of metal instead of the last, it has to fit inside the shoe and be secure enough to hammer on to.

Sutton Hoo shoe Sf9 mound 1

Seam between the sole and the upper.

Once the shoe’s been turned, all the seams tend to stick up in an uncomfortable manner. The next step is to dampen down the seam inside and out, and gently hammer to compress it until the seam becomes flat.

Sutton Hoo shoe Sf9 mound 1

Outside, hammering the sole seam.

It also seals the edges of the shoe on the outside. This is part way round, I’m hooking the seam up onto the top surface of the last and hammering down towards the edge to draw it all together.

Sutton Hoo shoe Sf9 mound 1

This is the inside at the same spot as the photo above.

Sutton Hoo shoe Sf9 mound 1

The sole seam compressed and the upper dyed.

Once the seam’s flat, dampen the upper down and rub in a coat or two of leather dye. You can use other things like woodstain, but it does tend to dry out the leather and make it brittle. Once this is dry, you can do any additional sewing, such as binding stitches around the throat or any decoration. Rub with a beeswax polish before wearing to get a bit of softness and waterproof the shoes. When you put the squirty bottle back, remember to clean off any incriminating leather dye first.

Sutton Hoo shoe Sf9 mound 1

Binding in progress.

I’ve done the edge binding on the upper shoe only, so you can see how it evens up the opening. It also stops the upper stretching when you wear them for a while.

Sutton Hoo shoe Sf9 mound 1

Close up of the binding stitch.

There is a thread running around the top of the upper, the whip stitches hold it in place.

Sutton Hoo shoe Sf9 mound 1

The embroidery.

Finished! The embroidery is  handspun undyed grey wool, I’ve used the same stitches as on the Bayeux Tapestry, where the thread goes in and out through adjacent holes in the leather so the minimum is inside the shoe. Glenda helped with the left one. All they need now is a bit of beeswax to make them more waterproof.

Sutton Hoo shoe Sf9 mound 1

Patterns and changes.

What would I do differently next time? Extend the short side C by about 15mm and move the slit back to the position shown by arrow A. Probably pay more attention to the centre of the toe and let the side seam sort itself out. If you are making one yourself, adjusting the width BB increases the height of the shoe over the top of the foot.

Sutton Hoo shoe Sf9 mound 1

Close up of the stitching. The long ones near the toe are 40mm, much longer and I’d have to couch them.

References:

Beatson, P., Shoe from Parliament St York 

Cameron, E., Carlisle, I. & Mould, Q., Craft, Industry and Everyday Life: Leather and Leatherworking in Anglo-Scandinavian and Medieval York: Leather and Leatherworking in Anglo-Scandinavian & Medieval (The Small Finds). YAT 17/16, 2004

Rogers, P.W., Cloth and Clothing in Early Anglo-Saxon England AD 450-700. Council for British Archaeology, 2007.

Tweedle, D. Finds from Parliament Street and Other Sites in the Ciry Centre, The Archaeology of York, The Small Finds YAT 17/4, 1986.

Another Saxon Quiver

Another Saxon quiver, this time 7th century. I was going to say something glib along the lines of “I won’t discuss construction as that has already been covered in an earlier post”. I’ve just checked that post, and in it, I left construction for a later post. I guess this will have to be it.

7th century Anglo Saxon quiver with arrows

While of a similar shape and height, this quiver is a little larger in diameter than the previous one. This is deliberate, as while primarily for my younger son, I also want to be able to use it and my bow has a 60# draw weight with correspondingly thicker arrows.

The change of period is mainly done by the decoration and as it wasn’t for an order, I could devote more time and effort to the design and execution without someone keeping asking when it would be finished.

Base

Cut a disk of softwood about 80mm in diameter and 20mm thick. I used a piece of pinus radiata from the wreckage of the First Airborne Viking Tent of blessed memory. You could use ply if you like, but I like to think real wood looks and works better. It will remain in the base of the quiver to protect the leather from the arrow points. Cut a rough circle in 3mm leather that’s somewhat over 120mm diameter – the diameter of the disk, plus twice the height, plus a bit for not quite being aligned properly.

Wet the leather and place the disk on the flesh side in the centre, then press into a 90mm storm water pipe connector and leave to dry. When the base is dry, pop it out of the connector and trim so the edge of the leather is flush with the upper edge of the wooden disk. This is the same way as I make bases for jacks and bombards – more in a later post.

Top

Rather than using a round of willow, this one has a piece of 1.6mm leather rolled until it is a bit over 12mm thick. Bring the rolled ends together to form a ring and secure with stitches. I used edge-grain stitching so all the shows is two neat parallel lines, one either side of the join. Dampen it and work any lumps or puckers out with you fingers until the roll is even. When in place, the tail will extend some distance into the quiver to help keep the round shape at the top. Mine was 370mm wide when it was flat, to fit an 110mm wide opening at the top of the quiver.

Body

This is where the fun starts. The width at the bottom is the circumference of the base cup you’ve made, plus three times the thickness of the leather. This is because the base is the measurement on the flesh side of the leather and you’re cutting for the skin side. You’re increasing the diameter of the base by the thickness of the body on two sides, so if using a non-stretchable material, you’d need to increase the length by 2*pi * the thickness, but the leather stretches sufficiently to meet neatly. Width at the top is the diameter of the tail of the top ring, plus a similar fudge factor. The height is just a bit less than length of your arrow from the back of the head to the base of the feathers.

The body and base with half the embossing done, showing all the tools used

Do any embossing and dyeing now, then start sewing. Remove the wooden insert and sew the base in using saddle stitch. I’ve done two rows because it helps keep the edges clamped in place. Put the wooden base back in, then start sewing the back seam. I’ve used a backing strip of 1mm leather and two rows of saddle stitch, but edge-grain would work equally well. You’ll need to do a bit at at time so you can get your hands in behind the seam. Then sew the top piece in and do the straps. Now you’ll have to do some proper hand bound arrows to match.

Decoration

Front and back of the Stonyhurst Gospel, c AD650.

The design, techniques and dye colours are based on the binding of the Stonyhurst Gospel. There’s still some pigment in the embossed lines

The Lindisfarne Gospels: Gospel of St Matthew the Evangelist, initial page. Lindisfarne, late 7th or early 8th century.

The paint colours and the some of the other design elements come from the more-or less contemporary Lindisfarne Gospel. I drew a quarter of the design on graph paper, then scanned it and used Paint software to mirror and fill in the missing bits. This was printed, transferred to the leather with yellow transfer paper and embossed with the back of a butter knife. Once dyed and assembled, I painted the design. As this was for a teenager, I cheated and used acrylic paints for the flats and gel ink pens for the embossed lines. The straps were finished with a suitable buckle and strap end.

An almost-right saex scabbard

This post is a warning for young players, going back in time to somewhere in the youth of the Internet. Back in those days, a fast connection was a dial-up connection with a 14.4kbps modem, a big website was anything over 1MB, and 800 x 600 in 256 colours was high resolution. The excellent series of YAT publications weren’t widely known here and and the publications that were available were more of the glossy coffee-table types. Online catalogues and web sales were years away and photos were only used on the most data-intensive sites. The images we had access to in the Antipodes were not of the finest quality, and lead to errors such as this.

I’d been given a combat-grade saex with a forged iron blade, leather bound scale tang hilt (the scales were two thickish slices of a branch with the bark still attached) with held together with rough steel rivets. The point was 10mm in diameter and the “edge” was 3mm thick. It had seen some use in combat and was rough, ugly and I couldn’t get my hand all the way around the hilt, but you don’t look a forged blade in the mouth. It didn’t take me long to reshape the point and file and grind an edge, and there was enough meat on the tang for me to be able to turn it into a whittle tang. I made the hilt from a carved lamb bone from a roast we had, with 3mm brass plates at each end. The tang passes through the backplate and is peened over. The buckles are made from the same lamb leg as the hilt, using opposite sides of the lower end of the femur near the joint. I then needed to make the scabbard.

Saex scabbard, loosely based on one from Jorvik. The original has much coarser knotwork but still shows paint in the same colours.

I knew of an illustration on the Regia Anglorum website and spent a ridiculious amount of time trying to work out the knotwork design. I relied heavily on contemporary manuscript knotwork, and drew the techniques from the MoL Knives and Scabbards book. I got it wrong.

This is the original illustration I was working from. If anything, I've been able to clean it up a bit.

It wasn’t until we got to York in 2003 that I realised that I was too keen to see the manuscript knotwork on the leather and that I’d misunderstood how the scabbard was used. The knife should fit almost completely in the scabbard, with the different knotworks corresponding to the blade and the hilt.  Here’s a photo of two similar scabbards I took in Jorvik:

Two saex scabbards at Jorvik.

The upper one shows similar punch work to this one from the Yorkshire Museum up the road.

Saex and knife scabbards in the Yorkshire Museum

The one on the right is discussed in another post. The one on the left is the one I attempted here. I’m happy with the stamped decoration along the edge of the blade, but the knotwork is completely wrong and the execution is 11th-13th century. I’ll have to remake it one day, but I need to work out if I have to shorten the blade first. The York postcard below shows someone else’s interpretation of a couple of scabbard, they have their own problems but aren’t bad.

Postcard: Replica leather knife sheath from The Jorvik Viking Centre.

I suppose the moral of the story is to make sure your references are clear before you begin anything.

References

 J. Cowgill, M. de Neergaard,  N. Griffiths, Knives and Scabbards (Medieval Finds from Excavations in London), HMSO London, 1987

Regia Anglorum, http://www.regia.org/, accessed 26 April 2006.

11th Century Saxon quiver and bracer

This was a commission to make a set of 11th century Saxon arrows and matching archery equipment. The remit was to use original materials, designs and decoration, but otherwise to please myself. The bow had a 45# draw at 28″.

DSC06958a

11th C quiver and arrows. I've used goose feathers, pitch and linen thread on the arrows.

Bracer

Evidence for bracers is missing from this period. The only bracers I’ve seen are 7th – 8th century bone, and 12th century leather. There doesn’t even seem to be any pictorial depictions in between, which is suspicious when details like the knots in the timber and thread binding on the arrows is shown in some of the pictures.   

DSC06960

11th C Saxon Bracer/Arm guard.

I’ve made a reasonable guess, based on everyone else’s reasonable guesses. It’s a bugger trying to shoot with baggy sleeves without one. The source in this case is Osprey’s Campaign Series 13, Hastings 1066 by Gravett, but I’m not kidding myself that it’s in any way accurate. Made from 6mm veg tanned harness butt and 2.5mm top grain leather. Decoration is dot circle and triangular stamp as on the quiver.

Quiver

We’re on firmer ground here, with quivers mentioned in the seventh century works of Aldhelm; “…just as the warlike bowman… when his bow is tensed by his powerful hands and arms and arrows are drawn from the quiver…” and depictions on the Tapestry. This one is based on the primarily based on the Tapestry, construction methods are inferred from other Saxon leatherwork of the period, such as the shoes from Parliament Street, York. 3mm top grain vegetable tanned leather; buckles are bronze, pine wood disk in the base. Stitching is done with natural undyed hand plied linen thread, beeswax finish over modern dye. Decoration around the top is done using a matched pair of triangular wooden stamps I made to do my saex scabard, and large dot-circle done with a rounded centre punch and a piece of brass tube. Colours are an interpretation of the Tapestry’s colours – I’ve used light brown where the embroidery was light and dark brown where the tapestry uses dark thread. The top roll contains a piece of split willow to retain its shape and protect the arrows when bumbed aginst rocks and the like.

Bayeux Tapestry marginalia

Archers immediately below “Hic Est Williemo Dux” at the end of the Tapestry. Quivers are shown sitting upright on the ground in the next panel, indicating flattish bottoms.

Examples of Saxon Archery

Franks Casket

Egil rains feathery death on his house guests. Lid of the Franks Casket, British Museum c.700, British Museum

St Edmund

St Edmund gets nailed to a tree, Life of St Edmund, Bury St Edmunds, c.1120 Pierpont Morgan Library MS M.736, f.14

Rebels

Rebels cop feathery death Harley Psalter, Canterbury c. 1000. British Library Harley MS 603, Psalm 2, f.2

Sources

Bernstien, D. J., The Mystery of the Bayeux Tapestry, Weidenfield and Nicholson, London, 1986

Gravett, C, Hastings 1066—The Fall of Saxon England, Campaign Series 13, Osprey Publishing, London 1992

Levick, B. http://www.regia.org/warfare/SaxonArchery.htm  accessed 25/02/08

Paulsen, Arrows and Bows from Hedeby (Pfeil und Bogen in Haithabu), in Das Archaologische Fundmaterial VI, Von Harm, Schleswig 1999 translated by H. Griffiths.

Strickland, M and Hardy, R, The Great Warbow, Sutton Publishing Limited, Phoenix Mill, UK 2005

Soar, H. D. H., Secrets of the English War Bow, Westholme Publishing, Yardley PA, 2006