If you are on my Facebook list, you’ve seen this post before, about a year ago. It’s a long story, I’d been wearing my old Parliament Street shoes for a few years, hoping nobody noticed that they were 3-600 years more recent than the rest of my gear. I was also having a whinge about not having accurate socks and came to an agreement with Jenny Baker that I’d make her a Rus knife in exchange for a couple of pair or nailbanded socks. The socks arrived, they were a perfect size but so thick my shoes no longer fitted. I’ve passed the old shoes on to Owen, who’d outgrown the ones he’d made when he wore size 5 (which I think have been passed on to Sven or someone).
I found the Sutton Hoo picture in a book while I was looking for something for Glenda, I’ve done some more research and found the embroidery on the toe was most likely done in linen, and that the shoe either had a binding thread, or was cloth lined.
Late 6-7th century shoes from Sutton Hoo Sf9 Mound 1,
reconstruction by Rogers. Found on top of the coffin,
one had folded tablet-woven wickelbands inside.
Construction is virtually identical to shoe (find 756) from Parliament Street in York, so I simply modified the patterns I had for that one. Pete Beatson’s covered the construction nicely in his webpage so I won’t cover it again here. I’m basing the stitching on Parliament Street as that is more accessible than the Sutton Hoo dig report. Sole is attached to the upper with (synthetic) sinew using grain/edge stitches on the sole and grain/flesh on the upper at a 6mm pitch. Side seam and top edge/binding are done with edge/flesh stitches in linen at a 3mm pitch.
All the parts laid out next to the pattern.
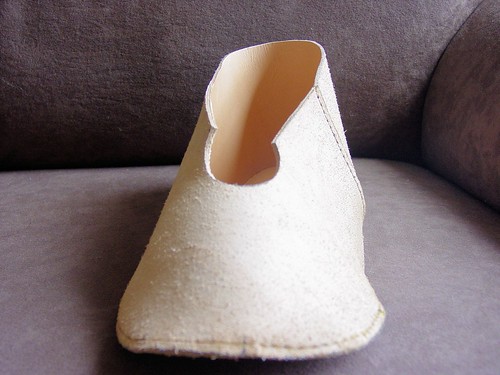
I’ll cut the eye in the front of the shoe when the shoe is complete and I’m happy with the location.
The upper showing the grain/flesh holes for attachment to the sole and the edge/flesh holes for the side seam.
The lasting margin (distance between the stitching and the edge) is the same as the thickness of the sole leather. This makes the seam not intrude into the shoe when it is turned.
The sole showing the edge/flesh holes.
I try to get the awl to go through the full thickness of the corrium (flesh layer) and come out just at the base of the skin when I’m doing these stitches. It gives a more secure attachment as it uses as close to the full thickness of the leather as possible.
The shoe is stitched inside out and then turned when all the seams are finished.
I’m about a third of the way around and am using sinew to attach the sole. The side seam aligns with the instep on the inside of the foot to minimise tension on the seam. Let’s assume for the purpose of the exercise that I’ve finished one. Yes, I know there’s five more stitches to go on the side seam, but just go along with me for once. Yes, I know I made a mess of the pattern and the back of the side seam is 3mm higher than the front, I’ll fix that after the stitching is done but before I turn it.
(Allegedly) completed shoe, side seam is at the instep and is done using hand twisted three-ply linen thread. One of the socks responsible for all this nonsense is in the foreground.
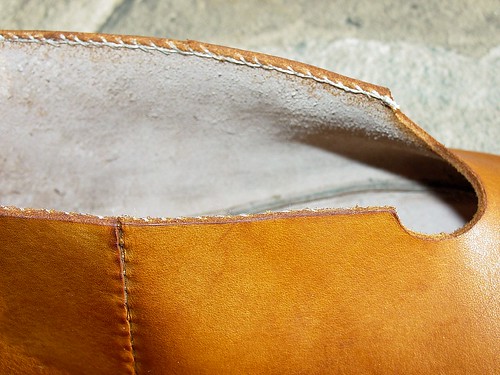
Inside of the side seam.
Here you can see how the thread passes through the edge of the leather but never comes through the surface. The missing stitches are to illustrate the way the edges meet and have nothing to do with me breaking a needle, running out of thread or being fed up and wanting to go to bed.
View of the sole, stitched with sinew
The thread goes through the flesh side of the leather and out through the side. It then neatly pierces the upper from one side to the other, then turns around and has another go. Its tied at an arbitrary 15 stitch interval… Or 20… or in one case, 10. When I tie a knot at the end of a length of thread, I thread both free ends onto a needle and pull them both through the nearest hole. A bit of tension then pulls the knot into the hole and the tails get cut off. That way there’s nothing to cause blisters and I look cleverer.
Now all I need to do is turn the shoe the other way out, dye the leather, wax the leather and do the embroidery… and then the other shoe. I’ve managed to get away with shedding only a small amount of blood, mostly from stab injuries.
The opening near the toe cut and the side reshaped to fix the mistake.
Soaking the shoe in barely warm water before turning.
For best results, it has to be really soaking wet, damp leather will stretch, really wet leather won’t as water gets between the fibres and stops them sliding over each other.
Starting the turn.
Sit the shoe in your lap with the heel pointing towards you. Stick both thumbs in at the toe and push it in, then simply keep rolling the leather with your hands…
GGNNNNNNNNHHHHH…!!!
Until you get to this stage where the toe is fully turned and the heel is just about to go. Turn the shoe around and roll the heel in towards the middle of the shoe. The back should pop round with minimal stress on the seams and without stretching. There. That was easy! I don’t know what you were complaining about.
The turned shoe.
Now the shoe is the right way out, just go around the seams and ease any twists or bumps. Make sure it looks like a shoe should and leave it to dry. There’s another step when it is just damp, as you do want to stretch the upper around a bit where it reaches the sole. Dyeing it while still damp also helps level out the dye.
Of course, when you’ve forgotten about it and let it dry completely you need to do things differently. You’ll need some additional equipment: a hammer; an iron shoe-makers last and; a stolen squirty bottle from the ironing.
The implements.
You could use a bent piece of metal instead of the last, it has to fit inside the shoe and be secure enough to hammer on to.
Seam between the sole and the upper.
Once the shoe’s been turned, all the seams tend to stick up in an uncomfortable manner. The next step is to dampen down the seam inside and out, and gently hammer to compress it until the seam becomes flat.
Outside, hammering the sole seam.
It also seals the edges of the shoe on the outside. This is part way round, I’m hooking the seam up onto the top surface of the last and hammering down towards the edge to draw it all together.
This is the inside at the same spot as the photo above.
The sole seam compressed and the upper dyed.
Once the seam’s flat, dampen the upper down and rub in a coat or two of leather dye. You can use other things like woodstain, but it does tend to dry out the leather and make it brittle. Once this is dry, you can do any additional sewing, such as binding stitches around the throat or any decoration. Rub with a beeswax polish before wearing to get a bit of softness and waterproof the shoes. When you put the squirty bottle back, remember to clean off any incriminating leather dye first.
Binding in progress.
I’ve done the edge binding on the upper shoe only, so you can see how it evens up the opening. It also stops the upper stretching when you wear them for a while.
Close up of the binding stitch.
There is a thread running around the top of the upper, the whip stitches hold it in place.
The embroidery.
Finished! The embroidery is handspun undyed grey wool, I’ve used the same stitches as on the Bayeux Tapestry, where the thread goes in and out through adjacent holes in the leather so the minimum is inside the shoe. Glenda helped with the left one. All they need now is a bit of beeswax to make them more waterproof.
Patterns and changes.
What would I do differently next time? Extend the short side C by about 15mm and move the slit back to the position shown by arrow A. Probably pay more attention to the centre of the toe and let the side seam sort itself out. If you are making one yourself, adjusting the width BB increases the height of the shoe over the top of the foot.
Close up of the stitching. The long ones near the toe are 40mm, much longer and I’d have to couch them.
References:
Beatson, P., Shoe from Parliament St York
Cameron, E., Carlisle, I. & Mould, Q., Craft, Industry and Everyday Life: Leather and Leatherworking in Anglo-Scandinavian and Medieval York: Leather and Leatherworking in Anglo-Scandinavian & Medieval (The Small Finds). YAT 17/16, 2004
Rogers, P.W., Cloth and Clothing in Early Anglo-Saxon England AD 450-700. Council for British Archaeology, 2007.
Tweedle, D. Finds from Parliament Street and Other Sites in the Ciry Centre, The Archaeology of York, The Small Finds YAT 17/4, 1986.


