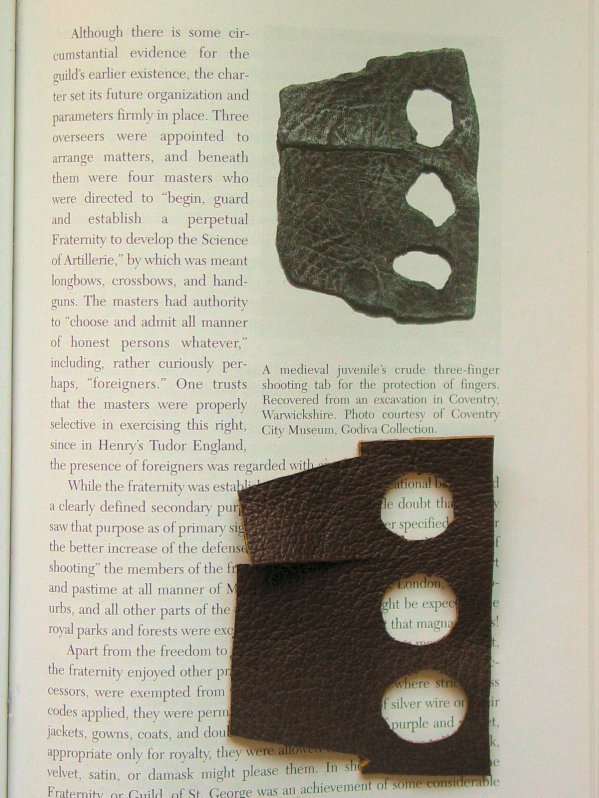
This is about building a copy leather bucket from the Mary Rose, which is admittedly mid-16th century leatherwork, but the design and construction was the same up to the mid-late 17th century. I’ve always wanted to make a leather bucket because I thought waterproofing them was going to be such a challenge.
Leather buckets were used as powder buckets, or fire buckets. The main advantage with leather fire buckets was that, unlike wooden buckets, leather buckets don’t have to be kept wet to keep watertight. Leather was used for powder buckets because they could be made without metal so there was no risk of striking a spark. Often the only difference discernible between water and powder buckets is that the powder bucket has the handle directly attached to the body and water buckets have metal rings for handle attachment and are sometimes reinforced with rivets.
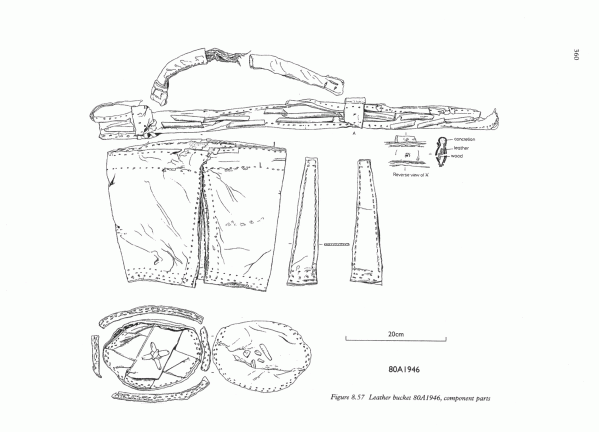
Scaled drawing from Gardiner. This one was found on the gun deck but as it has metal loops, isn't a powder bucket.
Woodworking skills come in handy with leatherwork – cut a circle of wood the same diameter as the inside of the base and at least double the height you want the base to be. This is used as a last for the base. Mine was in some 75mm thick pine I’d scavenged from a skip at a building site.
Cut a circle of 4.5mm leather the diameter of the base, plus the height of the down-turned edge, plus about 20mm as a lasting margin. Soak it until the bubbles stop rising, and then start moulding the base by working it over circle of wood and nailing it in place, first placing nails on opposite sides of the circle, then successively halving the space between the nails each time. Lasting pliers are great for this because they incorporate the pliers for stretching the leather over the last with a hammer for knocking in the nails so you don’t have to keep putting down one tool to pick up another. Puckers are smoothed out with thumb pressure and grunting noises as it starts to dry, this thickens the turned edge making it stronger.
Moist leather stretches, soaking wet leather doesn’t. This is because when it’s soaking wet, all the spaces between the fibres in the leather are filled with water and the water holds them in place. When it’s moist, only some of the spaces have water in them, allowing the water to move away from the point of stretching and lubrication the fibres so they can slide over each other more easily. The amount of stretch depends on which part of the hide you’re using, maximum stretch occurs in the direction from the neck to the tail, and minimum stretch across the hide. As leather stretches, it gets thinner, the last thing you want in something that’s going to carry weight without excessive flexing.
Once dry, cut the lasting margin off the base with a sharp knife, then you can lever out the nails and remove the remaining bits so you can use the last again later. Once all the pieces are cut out and the moulded base is dry, it’s time to dye them. The black/brown scheme can be found on a number of originals, I used commercial dyes, but you could try making your own.
The cross straps help support the base when the bucket’s full to avoid cracking the pitch. They are made from the same thickness leather as the base. The cross straps are held in place with a single tapered thong (obviously not the underwear or footwear) that passes through eight slits in the base and cross straps. The attentive ones of you will notice I’ve threaded it the opposite way to the bucket in the drawing, but it is the same way as the bucket 81A1582, two pages later. This took some particularly interesting noises and some force to achieve as I was trying to minimise the opportunities for leaks by leaving the slits as tight as possible.
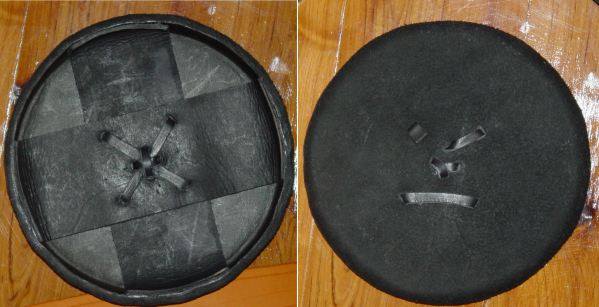
Outside and inside of bucket base, showing method of attaching cross-bracing.
Put the base to one side and start working on the bucket body. Skive/bevel the edges of the leather for the side seam, then sew with a saddle stitch. I used six-ply waxed linen thread that I plied, twisted and waxed myself from a huge roll we bought directly from a mill. If you are using the linen you get from the leatherwork shops, one or two plies should suffice. One of the reinforcing pieces then get sewn over the top of the side seam and the other directly opposite, using two plies of thread this time. The stitch pitch is quite coarse, about 2.5 stitches/inch, or about a centemetre each. The reinforcing pieces don’t go all the way to the top of the bucket, and some buckets have four reinforces instead.
Now it’s time to attach the lower band. There are three roughly evenly spaced rows of stitching, the joins are mid way between the reinforcing pieces and line up on both top and bottom bands. The top row of stitching only goes through the side of the bucket, and holds the lower band in place while you then bugger around getting the base and the welt right. Start stitching about 25mm/1″ from the end of the band so you can adjust the ends of the leather so they line up neatly.

Showing the method of attaching the lower band of the bucket, prior to inserting the base
Try to keep the stitching underneath the bucket as straight and even as you can. The leather can be 16mm or thicker in places depending on the weight of leather that you’ve used, so you’ll have to pay attention. Once the first row of stitching is done, hold the base in place and push the welt between the base and the side. If the pattern is right, it should be a tight fit and hold everything in place while you do the bottom row of stitches. If not, you can improvise with additional leather wedges to hold it steady. Remove the wedges as you get to them and pull the threads tight to even out the gap as much as possible.
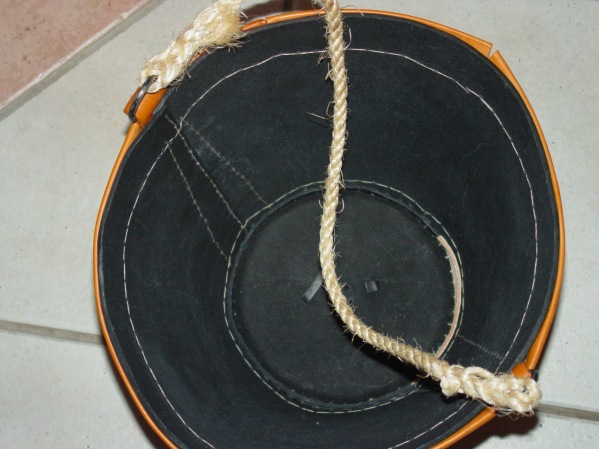
Inside the bucket, showing the base and welt in place. The handle attachments and top band have also been done.
The top band is similar, but different. The edges of the top band are folded before stitching, to help hold the wooden hoop in position. Just do the bottom row of stitches at this stage as the wooden hoop has to go in before the top row is done. When you get to the reinforcing strips on the sides, the handle loops have to go in as well. These are strips of heavier leather, just narrower than the wire loops and are folded in half and held by the same stitches as the top band. Make sure the wire rings are in place as they are more difficult to put in once the leather pieces have been stitched. I forged mine from some 120 year old iron wire that came off the wooden water pipes from Maldon in Victoria, but you can use commercial D-rings if you prefer.

Inserting the split willow hoop into the top band.
The willow was recycled from an old basket handle, I had to soak it for about 2 weeks in rain water to make it pliable enough to bend without cracking. Green willow may be easier to use, but was harder for me to get. As you can see in the above photo, the hoop goes behind the band and in front of the handle supports. The ends overlap by about 30mm, the timber was beveled with a sharp knife so the width and thickness didn’t increase at that point. I’ve pre-punched the stitch holes so if there’s any distortion of the leather, the stitches will pull it back into line. Finish stitching the top band in place. The handle support is held in place with a copper alloy rivet, to transfer some of the stress from the stitches to the leather. You can put it in any time from now until you seal it. I had to import a small supply from the USA as I wanted a brass finish, although pure copper rivets in 1/4″ x 1″ are available locally.

Finished handle and mount, showing rivet and maker's mark. The rivet is too small and has since been replaced with a much larger one.
The handle is 13mm/0.5″ rope wrapped in leather. The rope is the structural element of the handle, the leather covering makes it fire resistant and more comfortable to use. The original material was hemp, I’ve used sisal as the rope can’t be seen when finished, but it was important to have the right sort of fibres showing through the thin leather covering. To increase the load bearing ability of the handle, I back-spliced the rope to the wire loops before stitching the covering in place. The cover is held in place with a simple saddle stitch on about a 6mm/0.25″ pitch; I found it easier to start in the middle and work towards the ends. The last bit of leather is a bit fiddly, but is poked through the wire loop and stitched in place. Most originals have this going from the outside to the inside of the bucket, but a few have it from the inside to outside or even one each way.

Trim the leather close to the handle, dampen it along the seam and rub with a lamb bone to compress it so it stays flat. The bit closest to the camera has already been done.
Your bucket is now ready for waterproofing. The originals were coated on the inside with Stockholm Tar, an approximately equal mix of black pine pitch and linseed oil, diluted with vegetable turpentine to make it brushable. The oil makes it more flexible than pitch on its own, the full buckets have quite a bit of movement when picked up.
I have the luxury of a small supply of brewers’ pitch, so could make my own. If you want to buy Stockholm Tar, it is still available in Australia from farrier’s suppliers but costs upwards of A$140 per litre so will make this a very expensive project. You can use the black brushable water tank sealants available from good hardwares for about $35/L with the same appearance and smell, and no one will be any the wiser. Just make sure it is rated safe for drinking water collection because sooner or later someone will drink from the bucket.
When pitching, I usually wrap the bits I don’t want pitched in plastic or aluminium foil to keep splashes off. Brush on three heavy coats, leaving each to dry completely before doing the next. If you want to paint the date or some other sort of design on the outside, do it now. Otherwise, just give it a couple of coats of a bees wax/turpentine furniture polish to protect it from the water and test by filling with water and standing the bucket in a tray or larger bucket overnight to catch anything that’s leaking out. Allow it to dry and reseal if necessary.
An occasional rub with the polish is usually enough to keep the bucket in useable condition. I’ve found I have to re-proof the inside about every 5-10 years to keep everything watertight.
That about wraps it up, but this project reveals the traps out there for the unwary. There’s occasionally a problem with working from dig reports – sometimes they don’t have time to make corrections between discovering an error and going to press. My bucket is a victim of this sort of problem. Here’s a photo I took in 2003 of one of the reassembled originals on display in the Mary Rose museum.
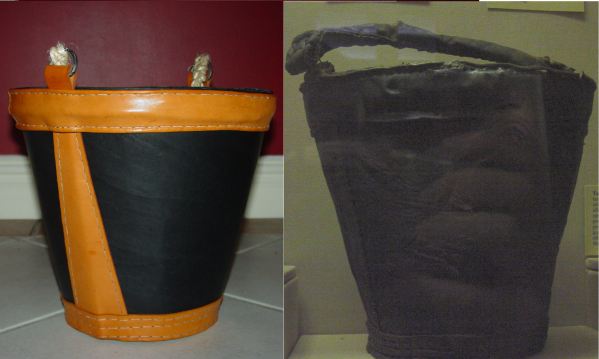
My bucket in more distinguished company
A leather bucket should have multiple layers at the base, working from the outside in, they should be:
- the bottom band
- the bucket body
- a welt
- the bucket base
- the cross straps.
The reconstructors at the MR museum put the welt between the base and the cross straps, then had to flare the base to meet the body, resulting in a shape that is more
____
/ \
than
_____
| |
When I did my copy, I based my base dimension on their flared one, then added the thickness of the welt (twice as it is a circle) to get the diameter at the base of the bucket. The difference is about 6mm.
