I’ll assume everyone’s done the homework and read the Leatherwork from Hedeby post. If not, nip back and have a quick read. Check out the first couple of comments between Steve and me as well. I’ll wait…
This post is the first of a series about making my interpretation of a Hedeby quiver. It’s a combination of plates 22 and 25-27, trying to make sure all the pieces look at least vaguely like the ones found, knowing that there are two (or more) quivers in all the bits and in theory, paying attention to the presence or absence of thread marks on the leather.
This first part will be about making a last and the patterns for cutting the leather.
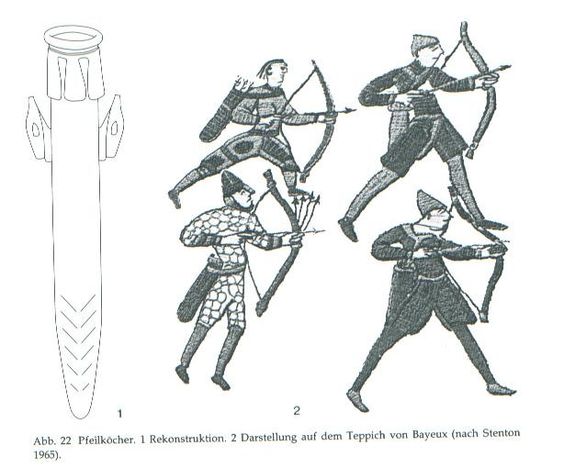
Here’s a dimensioned version of the reconstruction a. from figure 22.
Hedeby quiver, front and right side view.
Dimensions and the location of the side seam and heights of the suspension lugs are from the text on pp 36-7. The teardrop shaped piece from figure 27. 2a or b isn’t shown, I’ll get to it in a while. I had a theory and hoped it would fall into place during the pattern making.
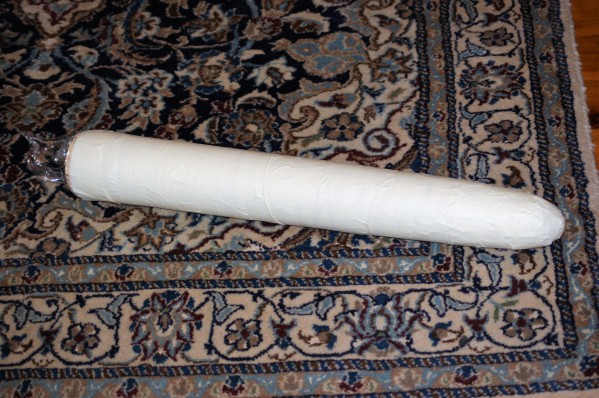
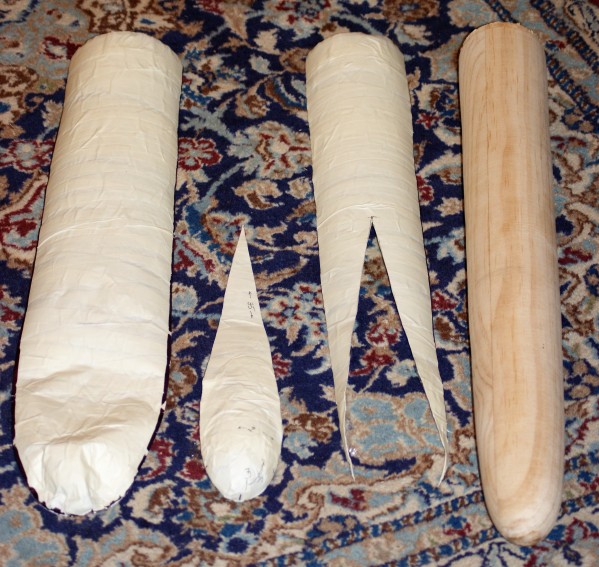
There was a week’s delay waiting for the workshop to be below 40°C during the times of day that I could make noise. We finally had a couple of cool days and I turned up a last the same shape and size as the interior of the quiver. The taper isn’t quite as steep as the proposed one in figure 22 because I’m not convinced that it would fit very many arrows if made as as shown. The wooden last was covered with a layer of kitchen film and a couple of layers of masking tape.
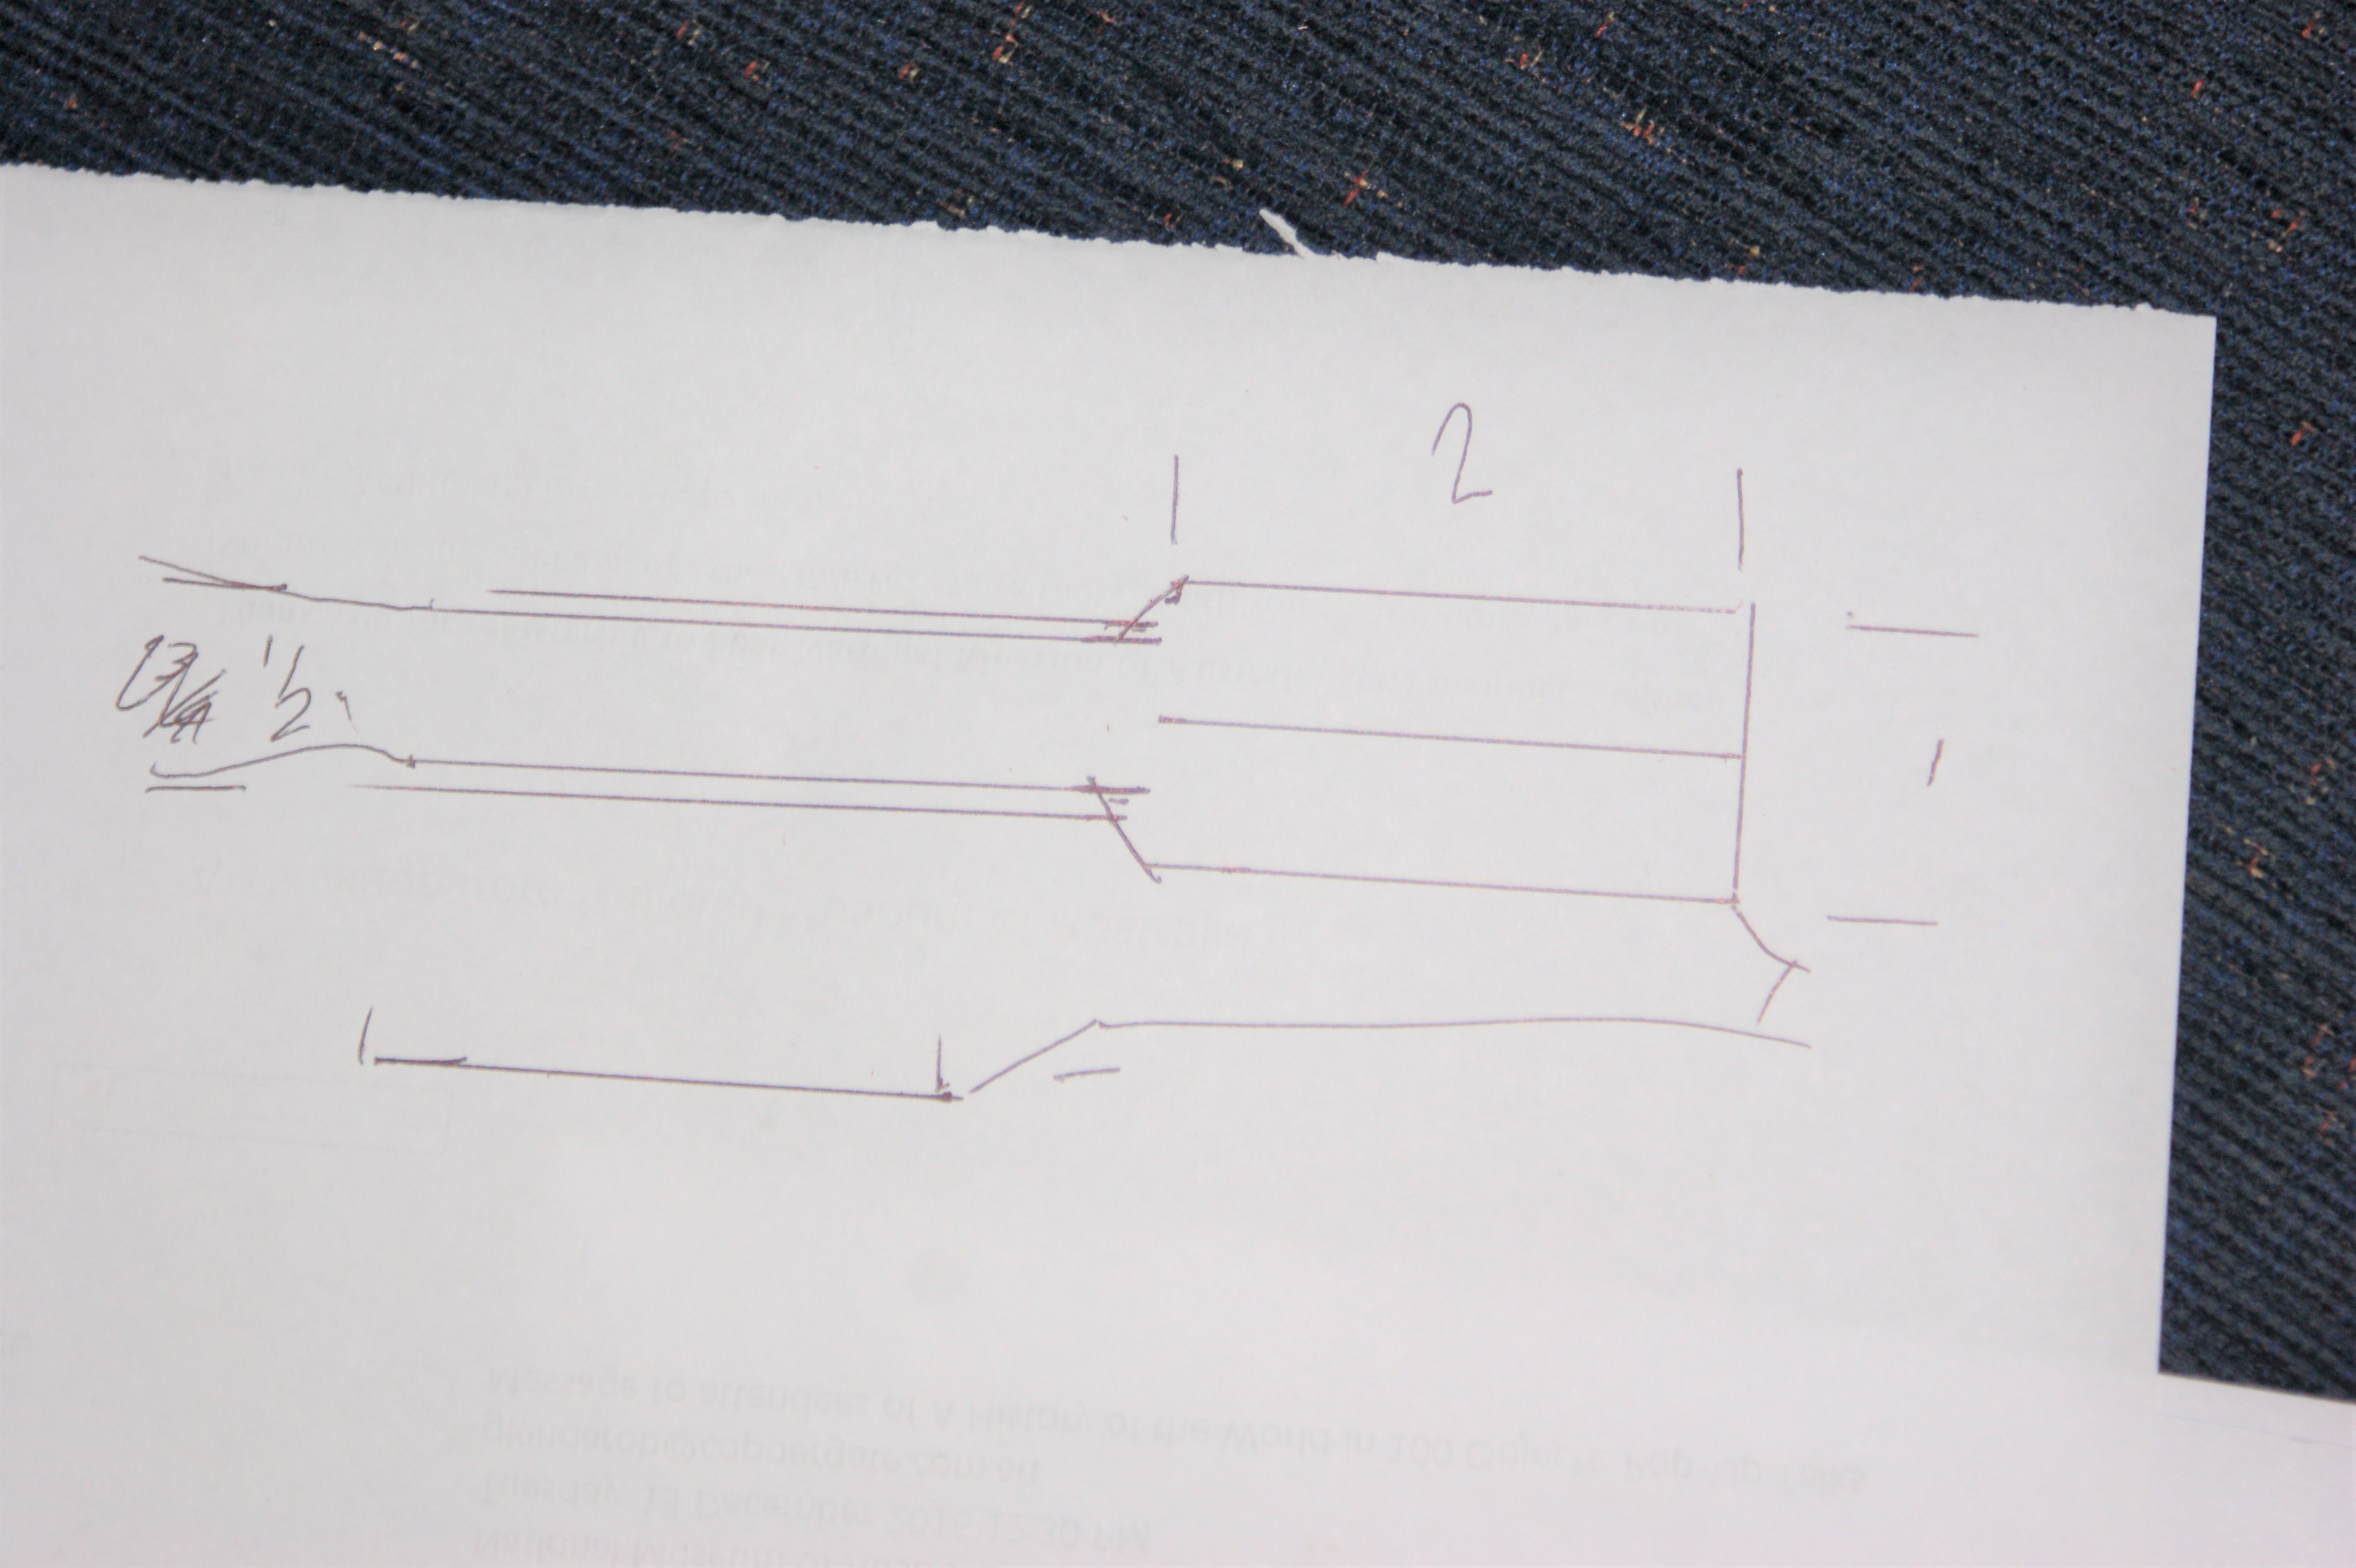
The next step was to mark out the individual pieces. The back piece is a bit more than 1⁄2 the width of the whole, and if the teardrop went where I thought, the front piece was about 9cm wide when measured about 4.5cm up from the point.
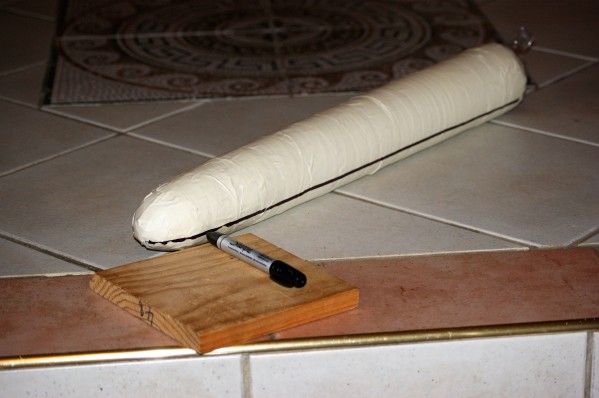
An arbitrary line was drawn from the point to the end. I’m using the grout lines in the floor to stop the last rolling, and the flat bit of pine as a sledge for the pen. Measure up 4.5cm from the pointy end, measure 9cm across and mark for the second line. I then rolled the last on the floor until pen point on top of the bit of 19mm pine hit the right spot.
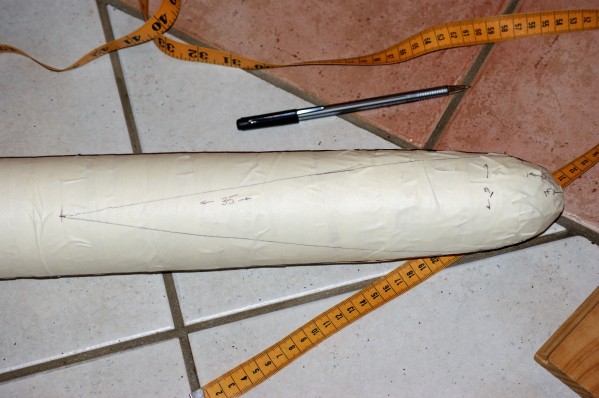
Measure 35cm up from the point and draw two lines to the sides, ending about 4cm from the point. If you do it correctly, the straight lines will form tangents to the arc and you’ll end up with a fairly perfect teardrop shape.
L to R: back, lower front, front, last. Not shown, top band, piping, suspension lugs. I’ll cover the top band in its own part, and just wing the piping and lugs as I go.
There’s some bulging in the back and lower front, but there’ll be enough stretch in the leather to accommodate them. The thing I like about this design is that the arrow heads only contact the lower front part. This is held in with edge-flesh stitches, making it an easy piece to replace without having to dismantle the rest of the quiver.
In the next part: cutting, sewing, fitting and dyeing.
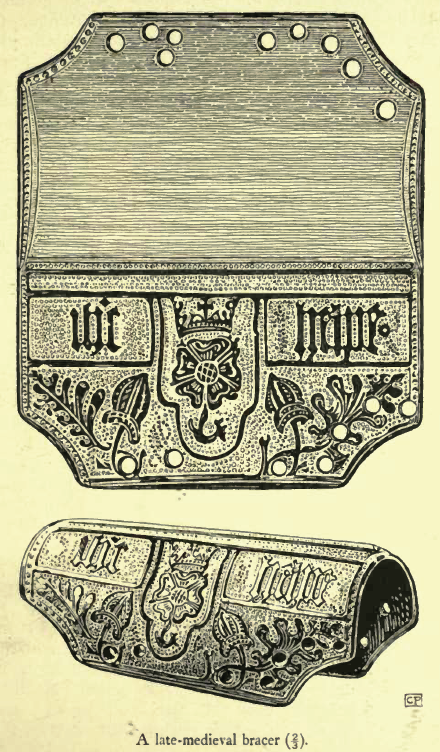
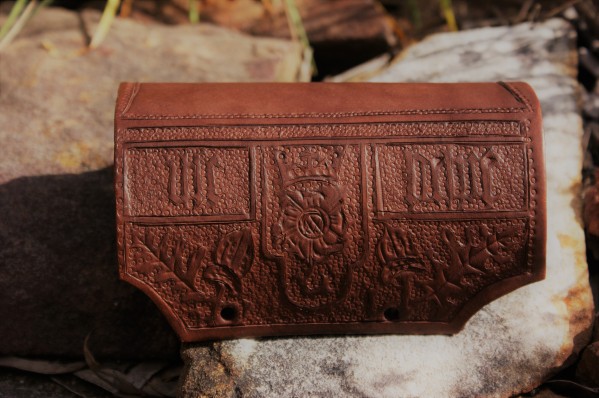
I had a great idea, but not one so great that my foot fell off. Why not make a copy of the bracer in the British Museum?, I thought. It will be easy, I thought. I have the report with a nice clear drawing.
Dalton, Antiquities Journal, Volume 2, 1922 p209
It looks fine, right up to the point where you compare it with the photograph of the real thing…
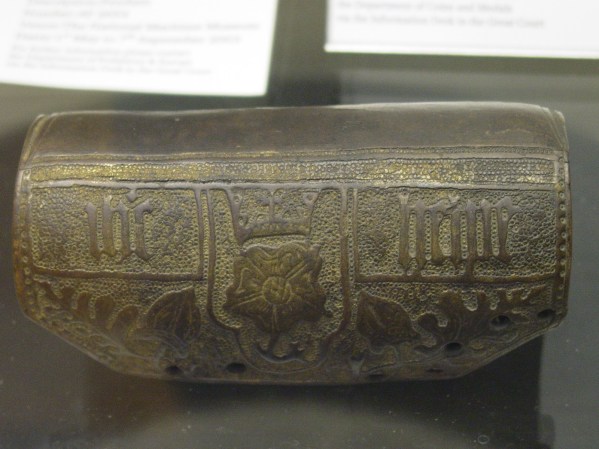
Bracer in the british Museum. My photo. That is an awful lot of gold.
When you try to use the published drawing, you find out there’s all these little fiddles like changing the size of the spots to make it work. The height of the decorated panel is okay but the two narrow ones above it are compressed. The lettering is all over the place as well and the sides of each panel don’t line up with each other in the same way they do on the original. Oh well, I’ll have to redraw it for the next one. The photo also shows how the gilding runs.
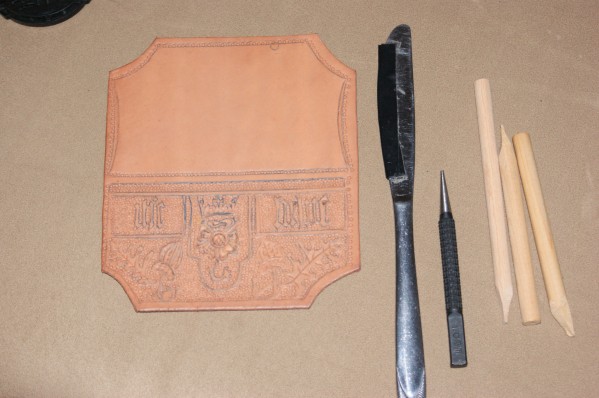
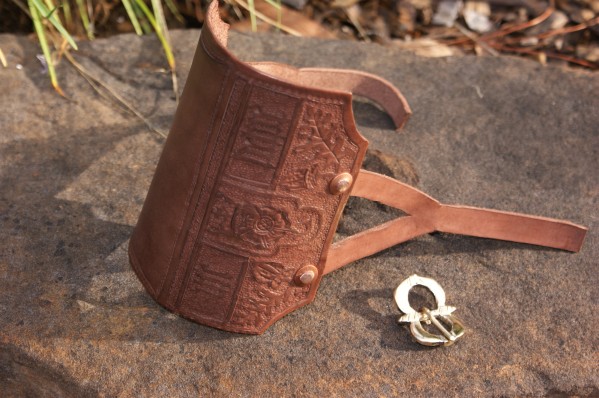
The process is simple enough. Transfer your design to the leather – because this one is to be gilt and painted, I just used plain old office carbon paper.
Straight off one of the problems becomes apparent. The pockles on the right have considerably more room than those on the left. I cut the outlines with a small straight blade as we’re predating swivel knives by several hundred years.
Empockelate appropriately with a 1.6mm nail punch, using kitchen utensils and home made punches as appropriate. Punch the holes for the strap, realising that they are too close to the edges and are the reason all the other holes were put in later for thong. Also realise that one hole in the drawing is too far to the right when compared to the other three. I tried swearing at this point, but it didn’t move the hole, so you can skip that if you like.
DieDye.
Enstrap and buckle. I either have to get faster at buckle making or give it up and buy them, I spend far too much time making the wretched things. I’ve gone with a copper alloy double oval loop buckle with moulded pin rests, making it date to between 1550 and 1650. [Whitehead, R., Buckles 1250-1800, Greenlight Publishing, Chelmsford 1996]
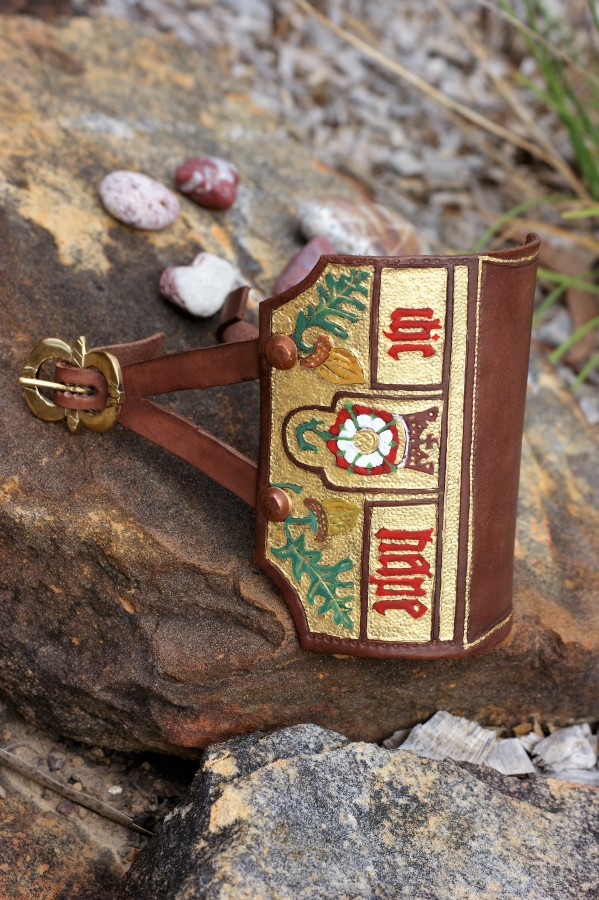
Painted bracer, it’s still a work in progress, I’ve since changed the colour of the crown.
Paint. The BM says some trace of pigment remains, having contacted them, it’s just a possible hint of red on the letters but they couldn’t tell me what the pigment was and if it was colour or bole (primer for the gilding). I’m going with colour, mainly from an ostentation point of view. Minium (red lead) substitute, rather than iron red in this case because it will be the same as on the rose. I also think the gilding is shell gold rather than leaf due to the way it sits down into the background rings and the narrow strips along the top and back would just be way too fiddly. There’s no evidence of the use of size under the gold in this case, either.
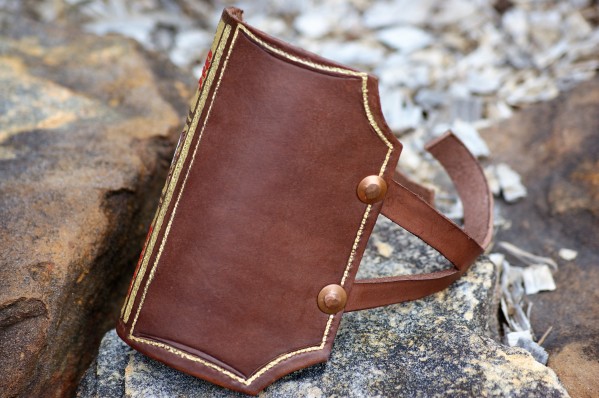
The painting on the other side is restricted to just lining.
I’m doing a Tudor rose, contemporary with the text, rather than a Yorkist white rose to match the tradition. It’s slipped and crowned (which may make it as late as Henry VIII or even Elizabeth) which didn’t happen with York white roses and I’m doing brown and ochre oak leaves and acorns, just because.
Yeah, it’s acrylic paint. Yes, I know I’ll have to apologise to Jesus, but I’ve been lead to understand that he’s fairly forgiving.
So I think I’ve finished it, it’s gone well as a fair copy of the reported illustration but I’m largely unsatisfied with it. I’ll have to have another go later.
While we’re on the subject, I need to vent a bit. The report begins on p208 of the Antiquities Journal with the sentence, “THE archer’s bracer illustrated in the fig. on p. 209 is of cuir bouilli, …” The BM repeat the assertion in their online catalogue.
I’m not sure what the fascination of antiquaries/archaeologists of this period is with cuir bouilli, they see it everywhere. Cuir bouilli, as the name implies, is a heat curing process that by its nature precludes tooling of the finished article. If you’re after more information on the subject, have a look at the late Marc Carlson’s Hardened Leather (Wayback Machine Internet Archive link) which also has some experiments on different methods.
I’ve picked up a commission to make a Hedeby quiver. First step is to have a go at translating the relevant chapter of the standard reference, Willy Groenman van Waateringe’s Die Lederfunde Von Haithabu into English. I sent it off to a friend who was working with a group of German-literate people for the first cut. What came back was great, but it was obvious the people were neither archers nor leatherworkers. I think I’ve tidied it up to the point where it’s as coherent in English as I ever get. There will still be errors, so if you see any, I’d appreciate if you let me know.
Original text is in blockquotes, English below each section and I’ll keep my comments in something obvious. We’re starting on page 38, although there is a little relevant information from earlier pages that I’ll interpolate as we go.
4.4 Pfeilköcher (Abb 22; Taf. 25-27)
Die folgenden sieben Lederfragmente gehören zu mindestens zwei verschiedenen Gegenständen.
4.4 Arrow quiver (Illus. 22; Plate. 25-27)
The following seven leather fragments belong to at least two different objects.
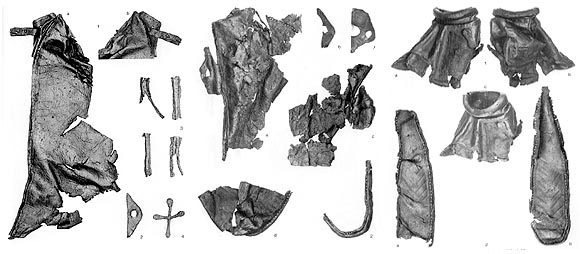
1. Unregelmäßiges, längliches Lederstück, (46) x (27) cm; an einer Stelle Nahtlöcher, keine Zwirnabdrücke, eingedrückte Verzierung; entlang einer Naht unmittelbar an einer ausgefransten Schmalseite ein annahernd dreieckiger Fortsatz, Basis 11cm, Höhe 4 cm, am Rand Nahtlöcher, darin eine ovale Öffnung (3 x 1,5 cm), durch die ein der Länge nach doppelt gefaltetes Lederband zusammenge wird; Fragment eines zweiten, dreieckigen Teiles mit einer Öffnung, das ursprünglich auf diese aufgenaht war (Taf. 25. 1-2).
1. Irregular, elongated piece of leather, (46 x 27 cm); along one edge are stitch holes but no thread marks on the surface, embossed embellishment; an approximately triangular extension, base 11cm, height 4 cm is attached. At the edge of the attachment are stitch holes, in it an oval hole (3 x 1.5 cm), through which a lengthwise folded leather strap passes; Fragment of a second, triangular portion with a similar hole, (Plate 25. 1-2).
2. Drei aneinander und aufeinander passende Fragmente, die zusammengefügt einen an einer Schmalseite runden und an der anderen Schmalseite annähernd zickzackförmigen Genstand ergeben, 45 x 20.5 cm, an allen Seiten Nahtlöcher, nur am oberen Rand Zwirnabdrücke an der Narbenseite, eingedrückte Verzierung; etwa 13 cm unterhalb des oberen Randes, auf etwa einem Drittel der Höhe, links und rechts zwei annähernd dreieckige Fortsätze (11 x 4.5 cm mitm; 10 x 6 cm), entlang dem Rand Nahtlöcher, eine ovale Öffnung, (etwa 2 x 1.5 cm Taf. 26. 1 a, c-d).
2. Three matching fragments that are joined together with a folded edge on the outer side and a damaged edge on the other, 45 x 20.5 cm, stitch holes on all sides, on the upper edge there are thread imprints on the grain side. An embossed decoration is about 13 cm below the upper edge and at about one-third of the height <update: one third of the length of this piece, not the height of the whole quiver>, are two roughly triangular attachments (11x 4.5 cm; 10 x 6 cm) on the left and right with seam holes along the edge and an oval opening, (about 2 x 1.5 cm Plate 26. 1 a, c-d).
3. Dreieckiges Lederstück, 10.5 x 4 cm; an beiden Seiten, nicht jedoch an der Basis Nahtlöcher; fast quadratische Öffnung, 1.5 x 1.5 x 1.5 cm (Taf. 26. 1 b)
3. Triangular piece of leather, 10.5 x 4 cm; stitch holes on both sides, but not at the base; almost square opening, 1.5 x 1.5 x 1.5 cm (Plate 26. 1 b)
4. Stumpf kegelförmiges Stück Kalbs-/Rindsleder, Durchmesser der oberen Öffnung rund 9 cm, Höhe 16.5 cm; der obere Rand zur umgeschlagenen Randstück eine Verstärkung aus einem dicken Lederstück; Radialnähte vom Typ 1 b, Zwirnabdrücke an der Narbenseite; im unteren Rand bogenförmige Öffnungen mit Nahtlöchern, eingedrückte Verzierung in Form eines Kreuzes (Taf. 27 1 a-c).
4. Truncated cone-shaped piece of calf / cow leather, diameter of the upper opening approximately 9 cm, height 16.5 cm; the upper edge of the folded-over edge piece covers a reinforcement of a thick piece of leather; Radial seams of type 1 b [single needle saddle stitch], thread marks on the grain side; in the bottom arched openings with stitching holes, embossed ornament in the form of a cross (Pl. 27 1 a-c).
5. Kreuzförmiges Lederstück, Länge der Kreuzbalken 9.5 cm und 8.5 cm; der Form nach identisch mit der Verzierung auf Fragment 4 (Taf. 25.4).
5. Cruciform leather piece, length of the cross beam 9.5 cm and 8.5 cm; in form identical to the ornament on fragment 4 (Pl. 25.4)
6. Zwei längliche, an einer Seite spitz zulaufende Lederstücke, 39 x 2-9.5 cm und (34.5) x 5.5-9 cm; die andere Schmalseite gerundet, an allen Seiten Nahtlöcher, keine Zwimabdrücke; eingedrückte Fischgrätverzierungen (Taf. 27. 2 a-b).
6. Two elongated pieces of leather, tapering on one side, 39 x 2-9.5 cm and (34.5) x 5.5-9 cm; the other narrow side rounded, on every side stitch holes, no thread imprints; Embossed herringbone decoration. (Pl. 27 2.a-b)
[Page 39]
Abb. 22 Pfeilköcher. 1 Rekonstruktion. 2. Darstellung auf dem Teppich von Bayeux (nach Stenton 1965).
Fig. 22 Quiver. 1 reconstruction. 2. Presentation on the Bayeux Tapestry (after Stenton 1965).
7. Sechs Fragmente von Randeinfassungen; der Form nach gehört die runde Einfassung (Taf. 26.2) sicher zu einem der unter 6. Beschriebenen Fragmente, die übrigen stammen möglicherweise su den unter 1.-2. beschriebenen Lederstücken.
7. Six fragments of edging; the circular rim (Pl. 26.2) belongs with one of the 6 outlined fragments, the others may have been below the other 1-2 leather pieces described.
Die Fragmente 1-5 werden hier als Teile von mindestens zwei Pfeilköchern interpretiert (Abbt. 22. 1). Grundlage dieser Ansicht bilden die Darstellungen von Pfeilköchern auf dem Teppich von Bayeux (Stenton 1965, Taf. 61-61; 70; X), auf denen deutlich zu erkennen ist, daß die Pfeilköcher der Bogenschützen einen verdickten oberen Rand aufweisen, ihre Seiten parallel geführt, das untere Ende gerundet und die Köcher selbst zumeist am Gürtel befestigt sind (Abb. 22.2).
The fragments 1-5 are interpreted here as parts of at least two quivers (Fig. 22. 1). This view is based on the depiction of arrow quivers on the Bayeux Tapestry (Stenton, 1965, plates 61-61, 70, X), which clearly show that the quivers of the archers have a thickened upper edge, the lower end rounded, and the quiver itself attached to the belt (Fig. 22.2).
Plates 25, 26 and 27, quivers from Hedeby
Da die Fragmente 1 und 2 unterschiedliche Länge besitzen, müssen sie von zwei verschiedenen Exemplaren stammen. Die Gesamtlänge der Köcher betrug, falls Fragment 4 als oberes Randstück auf Fragment 1 oder 2 aufgesetzt war, mindestens 62 cm. Das stimmt gut mit der Länge der Köcher auf dem Teppich von Bayeux überein, die einem erwachsenen Mann von der Hüfte bis kurz unter das Knie reichen. Aus den Nahtspuren am unteren Rand von Fragment 4 ist die Art der Befestigung auf Fragment 1 oder 2 nicht deutlich rekonstruierbar. Diese Spuren passen auch nicht zu der Naht.
[Page 40]
Beschrieben wird (Richardson 1961, Abb 19.24; S. 85): “Triangular appendage made of leather straps broken off below a rigid tubular thong with knobbed ends threaded through the straps to keep them spread out. The two outer straps are also threaded with thongs, one of which passes through the apex. Perhaps used for suspending a dagger or purse from the belt.” Es gibt aber, u. a. aus dem Dublin des 12. Und 13. Jahrhunderts auch Stücke, die hochmittelalterlich datiert werden (Katalog Dublin 1976, S. 43, Nr 188): “Leather object of unknown function. Oval with semicylindrical projection at each narrow end. Longitudinal slashing as ornament. Late 12th century. High street. Length 9.5 cm.” Ein vergleichbares Stück wurde 1974 bei den Ausgrabungen am Woodquay geborgen. [Note 15] In Southampton ist ein solches Lederstück als “shoe tongue, slashed and pierced at either end for attachment” (Platt und Coleman-Smith 1975, S. 301) angesprochen worden. Die Datierung bewegt sich vermutlich im 16. Jahrhundert. Ähnliche Stücke sind darüber hinaus im spätmittelalterlichen Ledermaterial aus Holand vertreten.
Since the fragments 1 and 2 have different lengths, they must be from two different items. The total length of the quiver if fragment 4 was placed as the upper edge on fragment 1 or 2, will be at least 62 cm. This agrees with the length of the quivers shown on the Bayeux Tapestry, which reach from the waist to below the knee on an adult male. From the seam marks on the lower edge of fragment 4, the type of attachment to fragment 1 or 2 cannot be clearly reconstructed. These stitch holes also do not match the seam described (Richardson 1961, Figure 19.24; p.85): “Triangular appendage made of leather straps broken off below a rigid tubular thong with knobbed ends threaded through the straps to keep them spread out. The two outer straps are also threaded with thongs, one of which passes through the apex. Perhaps used for suspending a dagger or purse from the belt.” But there are, however, other finds from Dublin of the 12th and 13th centuries, also pieces that are dated high medieval (catalogue Dublin 1976, p 43, No. 188): “Leather object of unknown function. Oval with semi-cylindrical projection at each narrow end. Longitudinal slashing as ornament. Late 12th century. High street. Length 9.5 cm.” A similar piece was found in 1974 during excavations at Woodquay. [Note 15] In Southampton such a piece of leather has been referred to as “shoe tongue, slashed and pierced at either end for attachment” (Platt and Coleman-Smith 1975, p.301). The dating is probably in the 16th century. Similar pieces are also represented in the late medieval leather material from Holland.
[Page 64]
Anmerkungen 15: Ich danke Herrn P. Wallace, National Museum of Ireland, Dublin, für die Erlaubnis, auf dieses Stück hier hinweisen zu können.
Note 15: I would like to thank Mr P. Wallace, National Museum of Ireland, Dublin, for permission to feature this piece here.
Anyone who knows me will already know that I disagree with the reconstruction shown in figure 22.1.
I’ve had a look around at what other people have done, and everyone seems to be using garment leathers to copy the appearance of the fragments after 1000 years in wet ground. As a consequence, no one has done the moulding on the top piece. I’ll be using vegetable tanned calf and cow leather so should be able to do those parts easily.
Thanks to Lissy O’Brien and her team of talented people. I owe you a beer and/or lunch.
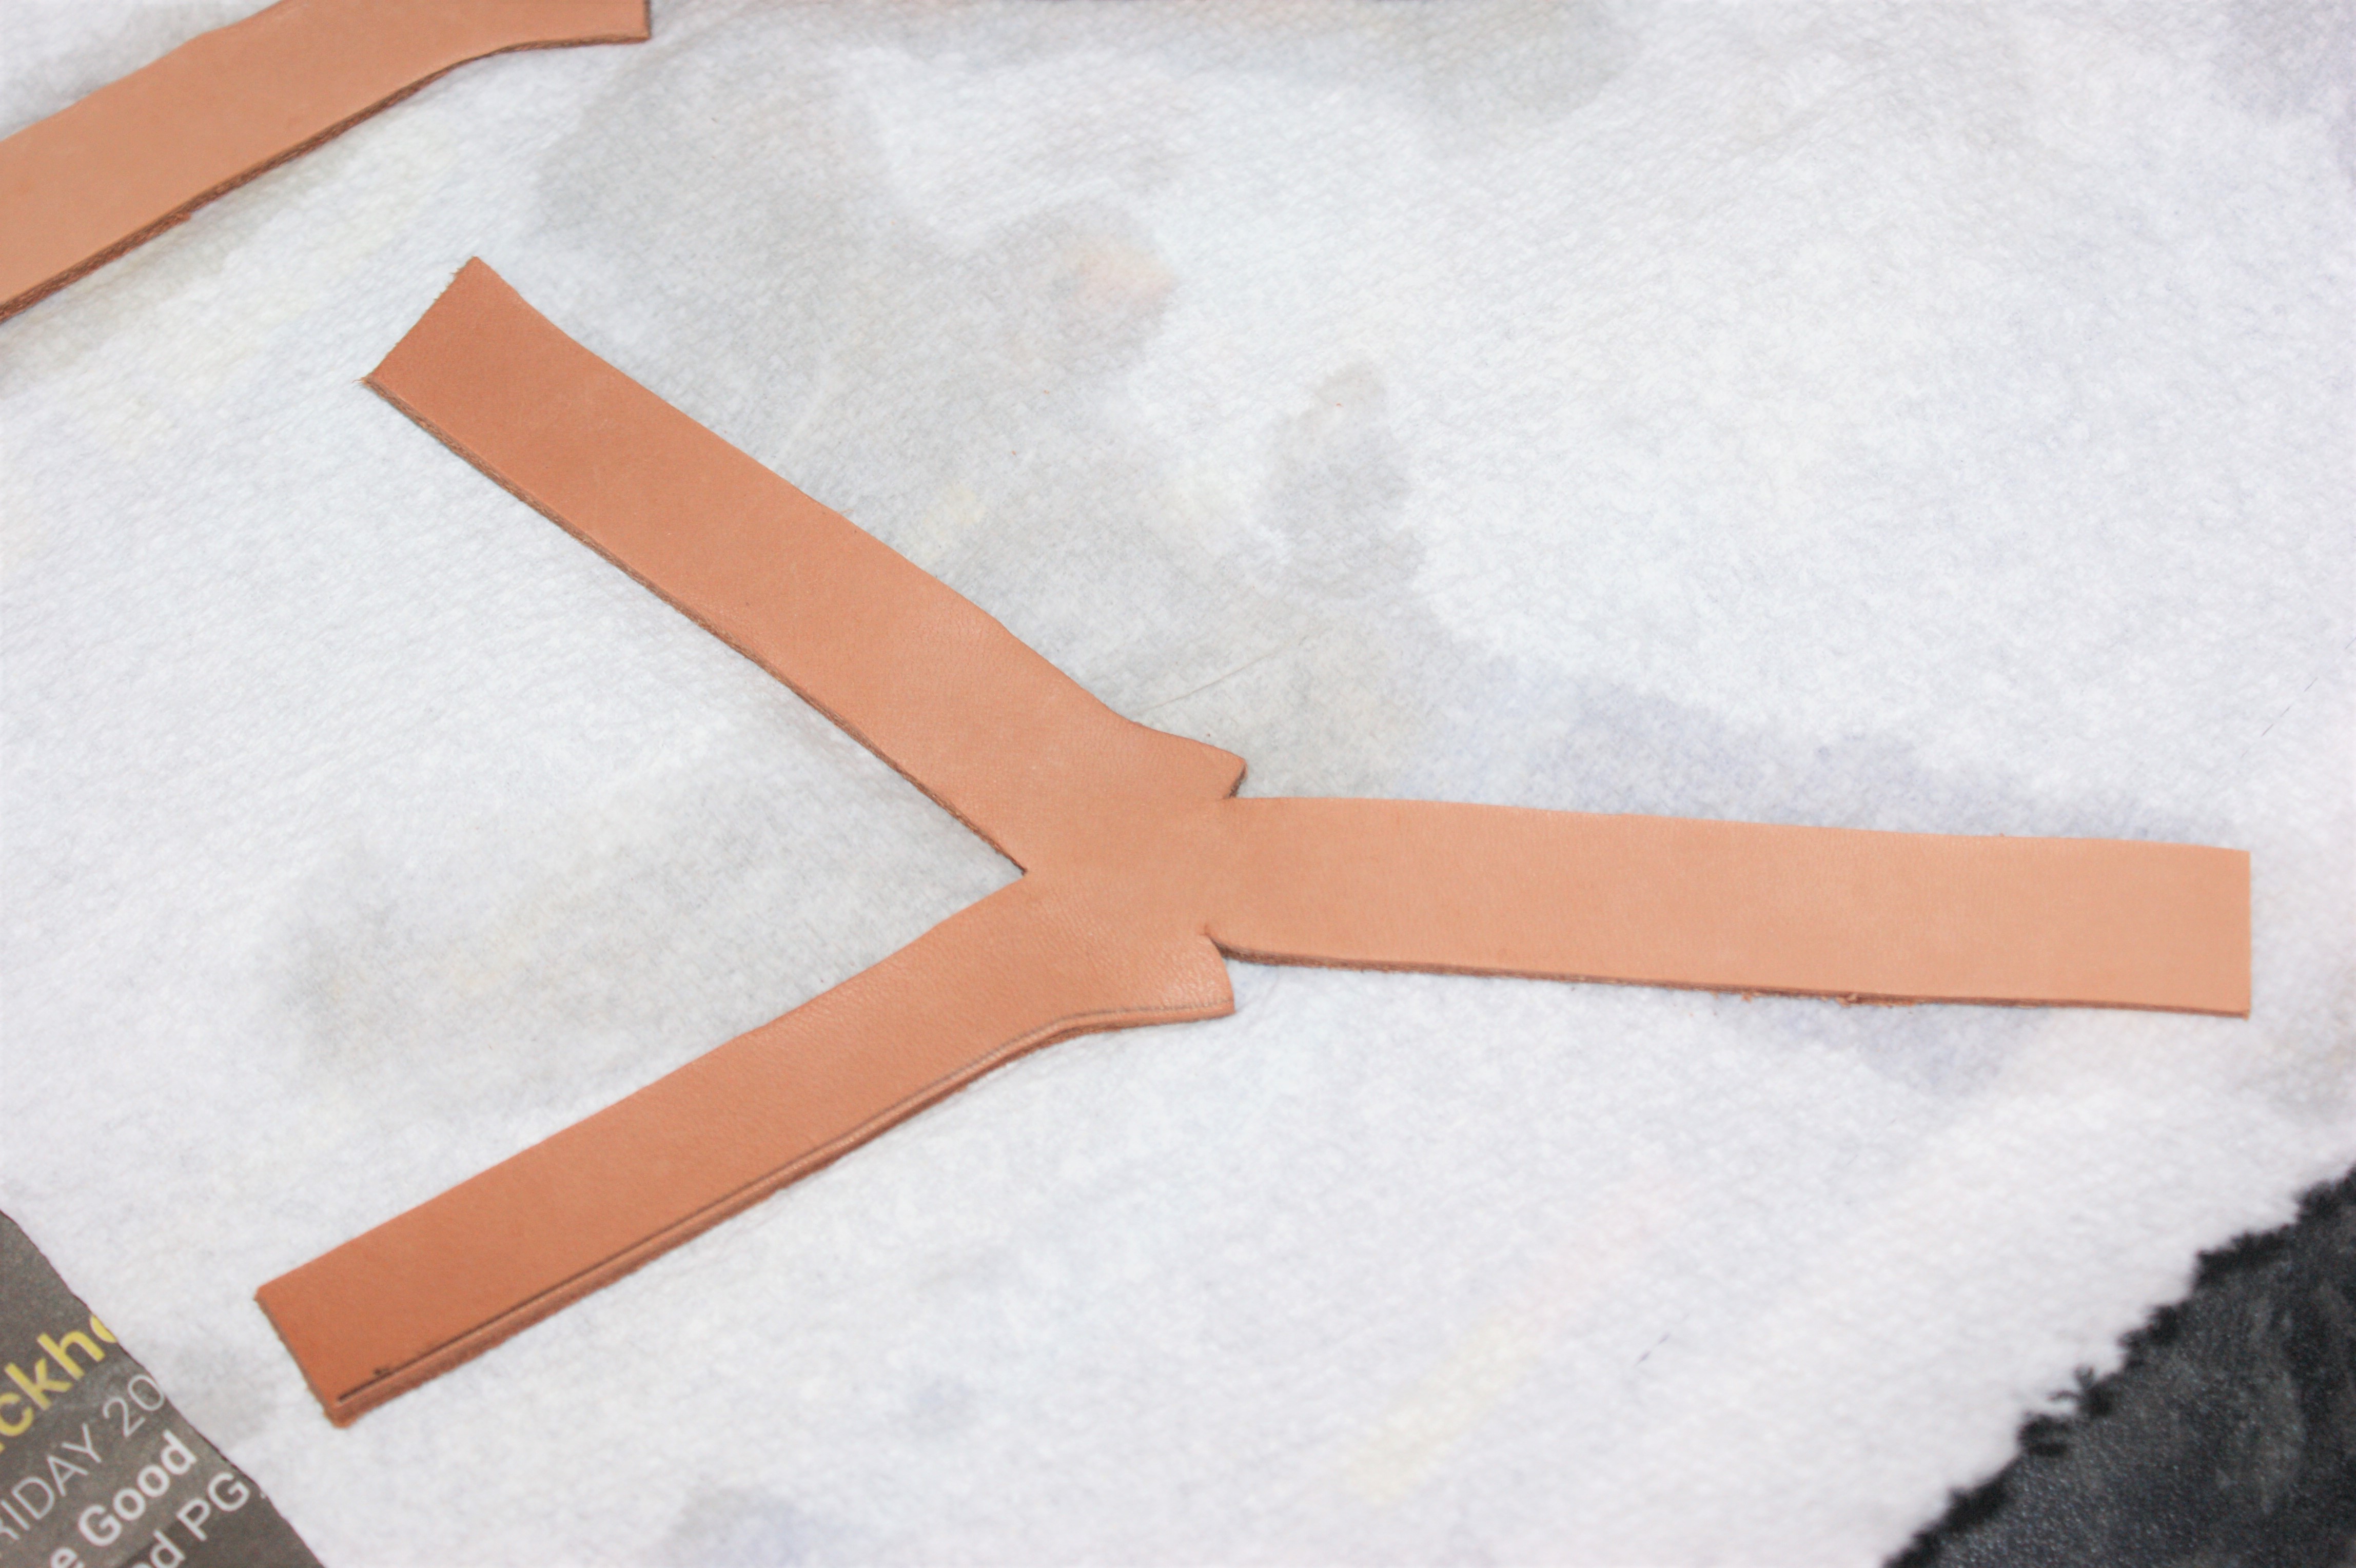
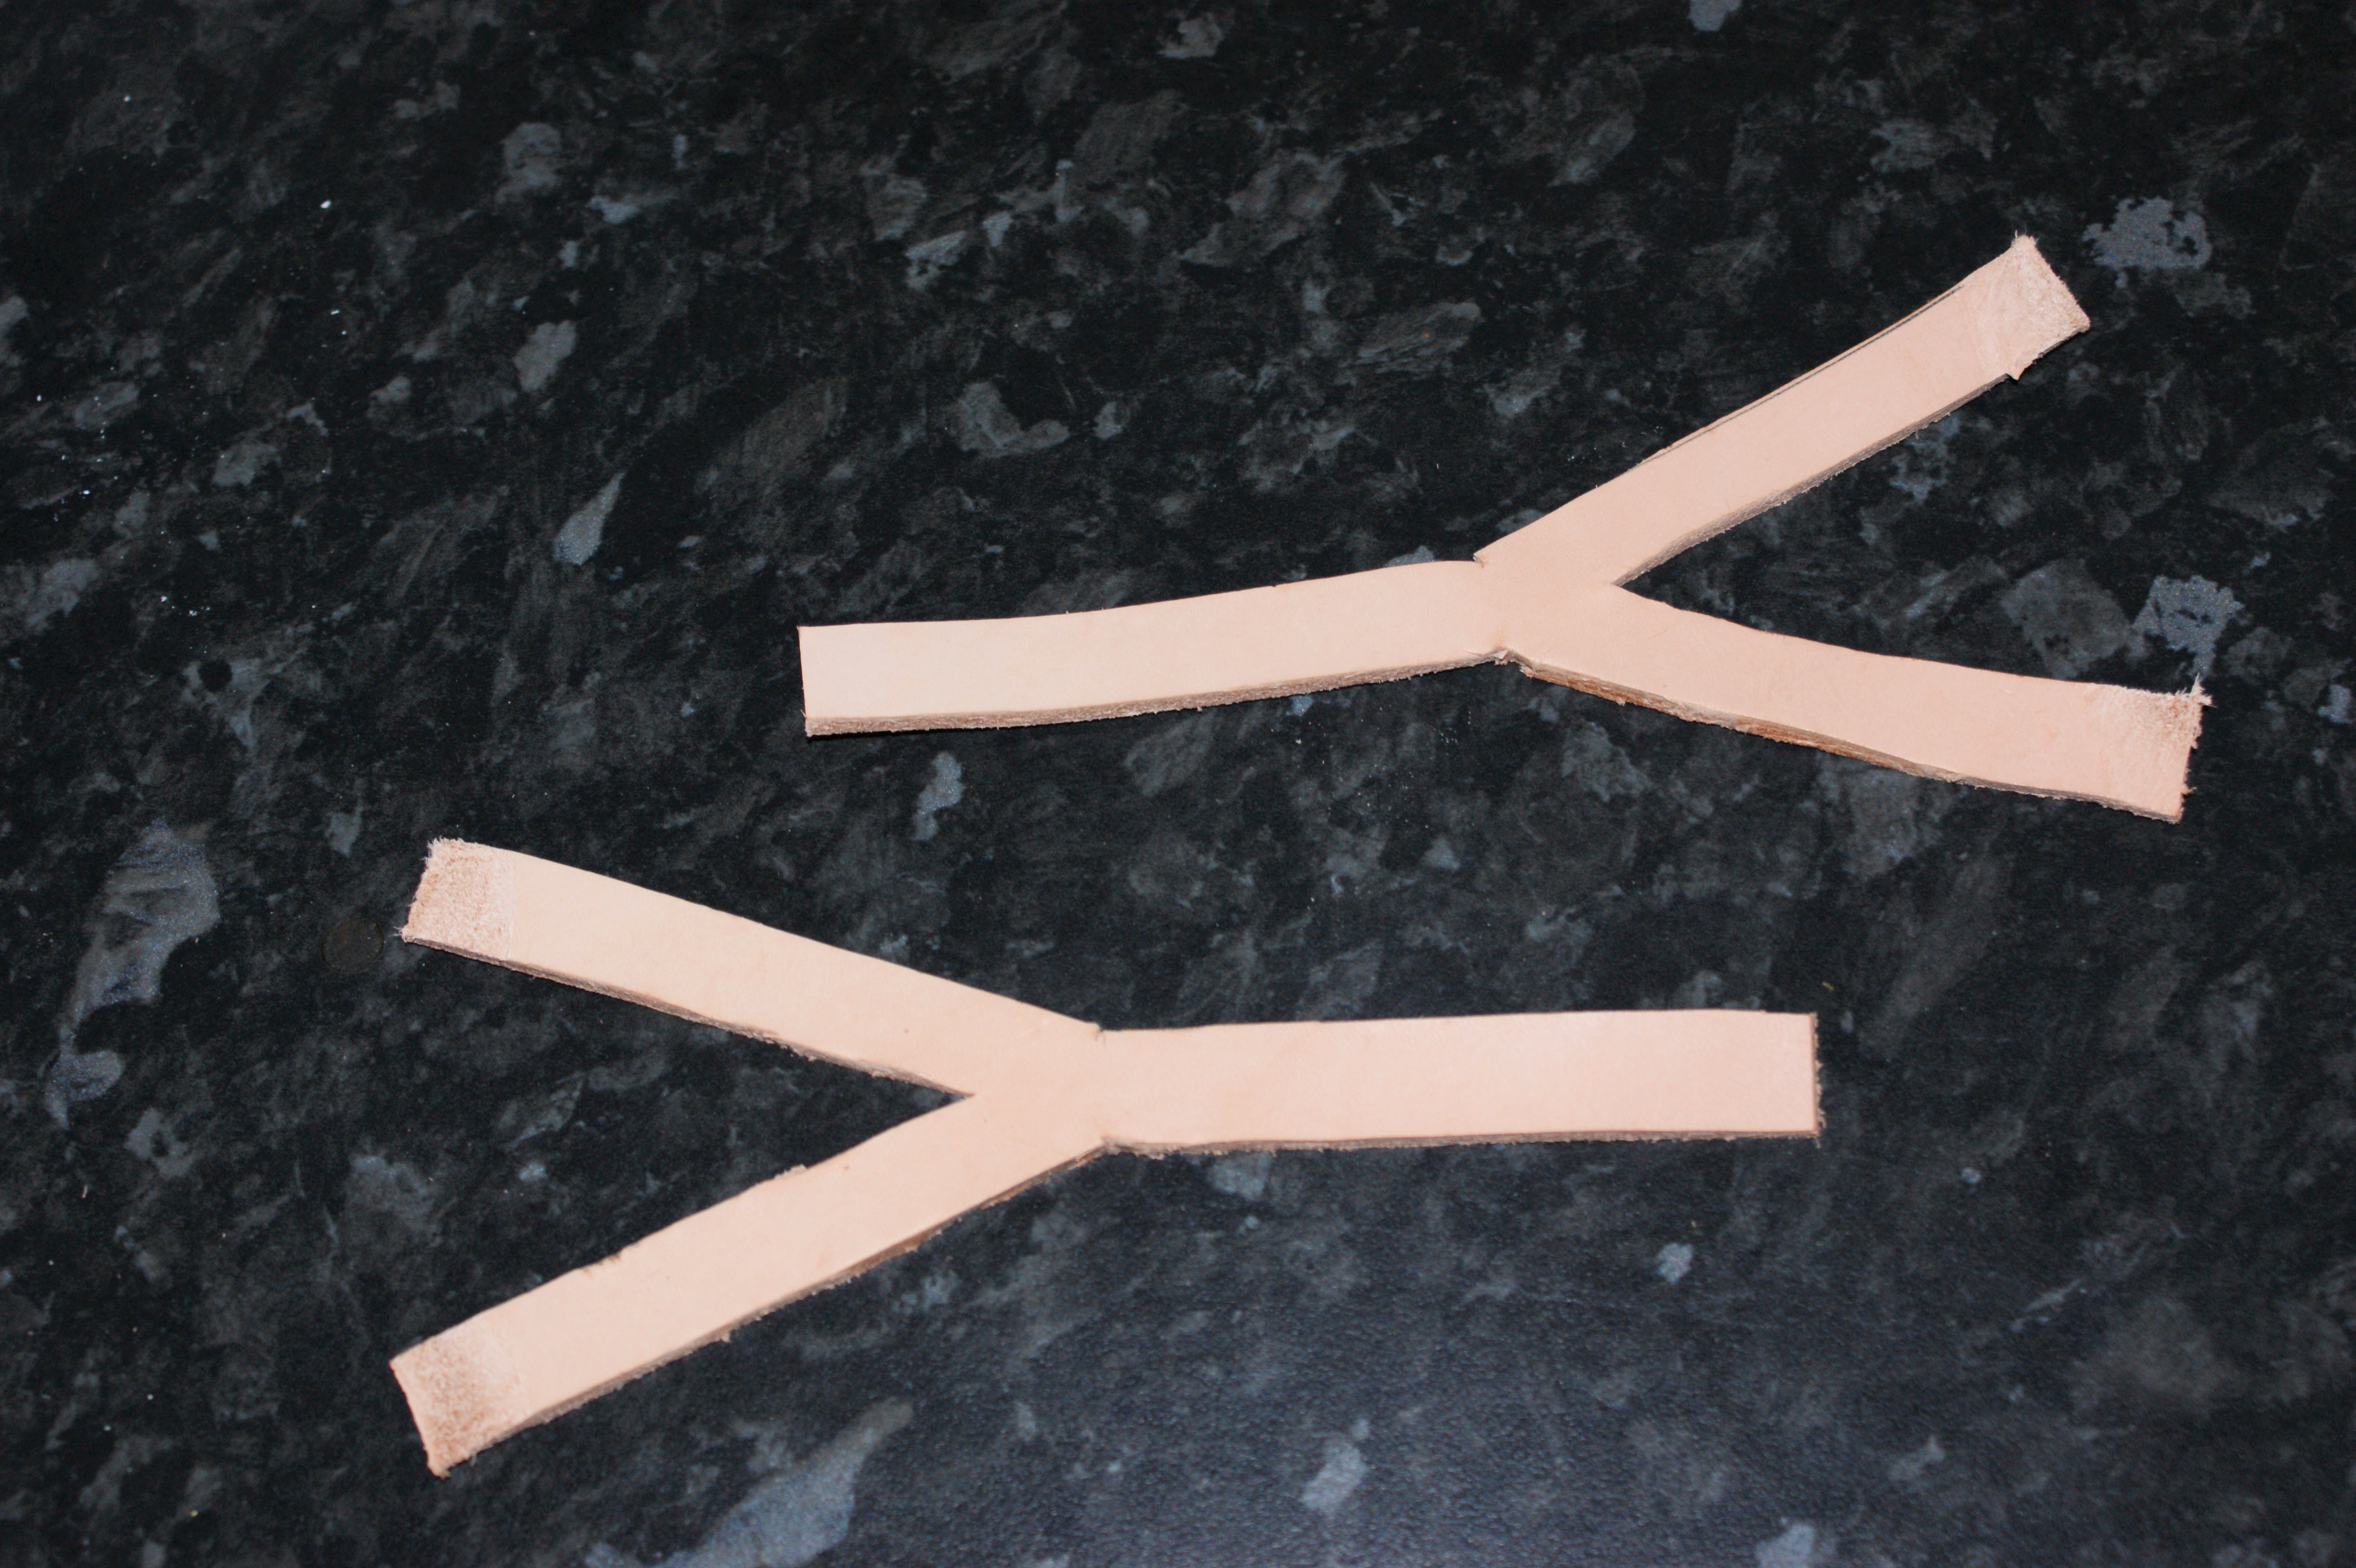
I keep meaning to do a post about the way I do the “Y” shaped straps on things. Rather than cutting the finished shape and wasting a big triangular piece of leather, I cut a strap twice the finished width, split it for the desired length and then wet the leather and stretch it to shape.
The approximate pattern on the hide. Sorry, I had meant to take a photo of the leather marked up but got carried away…
Wet at least the intersection, stretch the arms to the correct angle and work any bulges or wrinkles out with your thumbs. Let it dry.
Trim and skive to taste. I’ll be using these later.