If you go back to my earlier posts on making a Hedeby quiver, I commented that I had been able to match all the stitch holes and thread imprints on all parts other than the carrying tabs.
Hedeby quiver carrying tabs, redux
I’m now working on a group of new ones and this is the solution I’ve come up with. I’m using some of the narrow strips to wrap the edges of the tabs. This results in the outcome that I was chasing – stitch holes but no thread marks on the main parts of the tabs.
Interestingly, this is the same edge treatment as on the 6th-10th century flacket from Cloonclose, Co. Leitrim. The link is to a photo album on Facebook by Matt Bunker and is used with his kind permission.
It all began with a letter to the society… then an email from a PhD candidate and ended with the 1595 shoe horn evaporating in a cloud of logic.
Let’s go back to where the confusion began, in early 1921.
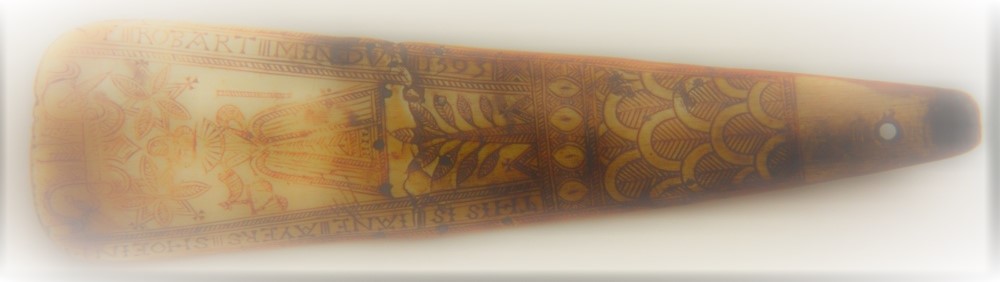
An Elizabethan Shoe Horn: Jane Ayres —This shoeing horn is inscribed as follows: —
“This is Jane Ayres shoeine Horne made by the hands of Robert Mindum 1595” Can any reader by any chance give me any information regarding Jane Ayres?
Percival D Griffiths, FSA. Sandbridgebury, St Albans
Notes & Queries Series 12, VIII (26 February 1921), p168
A deal of Mindum folklore hangs on this letter. Several authors, myself included, entertained romantic notions around two shoe horns for the same person in such a short period of time. We felt we were on a real winner when the “JANE HIS WIFE…1613” shoe horn appeared in the first decade of this century.
Griffiths amassed a large collection of English oak and walnut furniture and seventeenth-century needlework and is known to have owned two Mindum shoe horns. One was loaned to the Exhibition of late Elizabethan Art in conjunction with the tercentenary of Francis Bacon at the Burlington Fine Arts Club in June 1926. That turned out to be the 1597 shoe horn with the obliterated name, originally from the Drane collection, and sold in 1916 as part of Drane’s estate.
He loaned the other shoehorn on two occasions, in 1931 and 1933, with the inscription published in full in the first catalogue, and a brief summary in the later one.
In the section on the objects on loan from Percival D Griffiths, FSA in 1931, we have:
No. 766, p. 97: An Elizabethan Shoehorn engraved with a conventional design and a lady who represents ‘Justice,’ inscribed ‘This is Jane Ayers Shoeing (horn made by the hands) of Robert Mindum 1593.’
A loan exhibition of works of art being held in aid of the East London hospital for children at Dorchester Hotel in London organised by the V&A Museum from May 28 to June 18, 1931, ex cat. (London, 1931)
The other has a similar section for Griffiths’ objects.
450a Shoe-horn, inscribed and dated 1593.
A Loan Exhibition Depicting the Reign of Queen Elizabeth at Grosvenor Place in January-March 1933, ex. cat. (London: Battley Brothers, 1933), p63
This makes it fairly clear that Griffiths’ other shoe horn was the 1593 Jane Ayres one, now in the Salisbury and South Wiltshire Museum collection.
What went wrong?
There’s a couple of transcription errors obvious in the quoted Notes and Queries letter: the use of the letter J rather than I in the name “Jane”; the word “shoeine” used in place of “shoeing”; “Horne made by the hands” is an interpolation of text missing from the shoe horn, but matches the text on the other shoe horn in his collection, and; the incorrect year. I’m unable to tell whether the error was Griffiths’ or made by the publication. He may just have had illegible handwriting.
After the 1933 exhibition, we lose track of the shoe horns. They don’t appear in any of the articles or books on Griffiths’s collection, in his auctions through the major houses in the 1920s or the posthumous 1939 sales, nor in they do appear in the 1931 scrapbook recording a portion of his needlework and snuffbox collection, now held in the Metropolitan Museum of Art library. He did frequently sell items privately to other collectors and had a period of financial hardship in 1931/32 when he liquidated a portion of his collection.
The Salisbury object record notes the donation of the 1593 Ayres shoe horn by Lieut. Col. Frederick George Glyn Bailey (d. 1951) of Lake House, Salisbury in 1947. (Personal correspondence with Salisbury Museum’s Museum Assistant Valerie Goodrich, 18-25 September 2017). We have no information about how Bailey acquired the shoe horn, he maintained a residence at 4 Audley Square, London W1 in addition to Lake House and is likely to have encountered it while in London.
I’ve passed this information on to the Salisbury Museum, they’ve added it to the object record. There’s still a few holes in the provenance but we have pushed it back from 1947 to at least 1926.
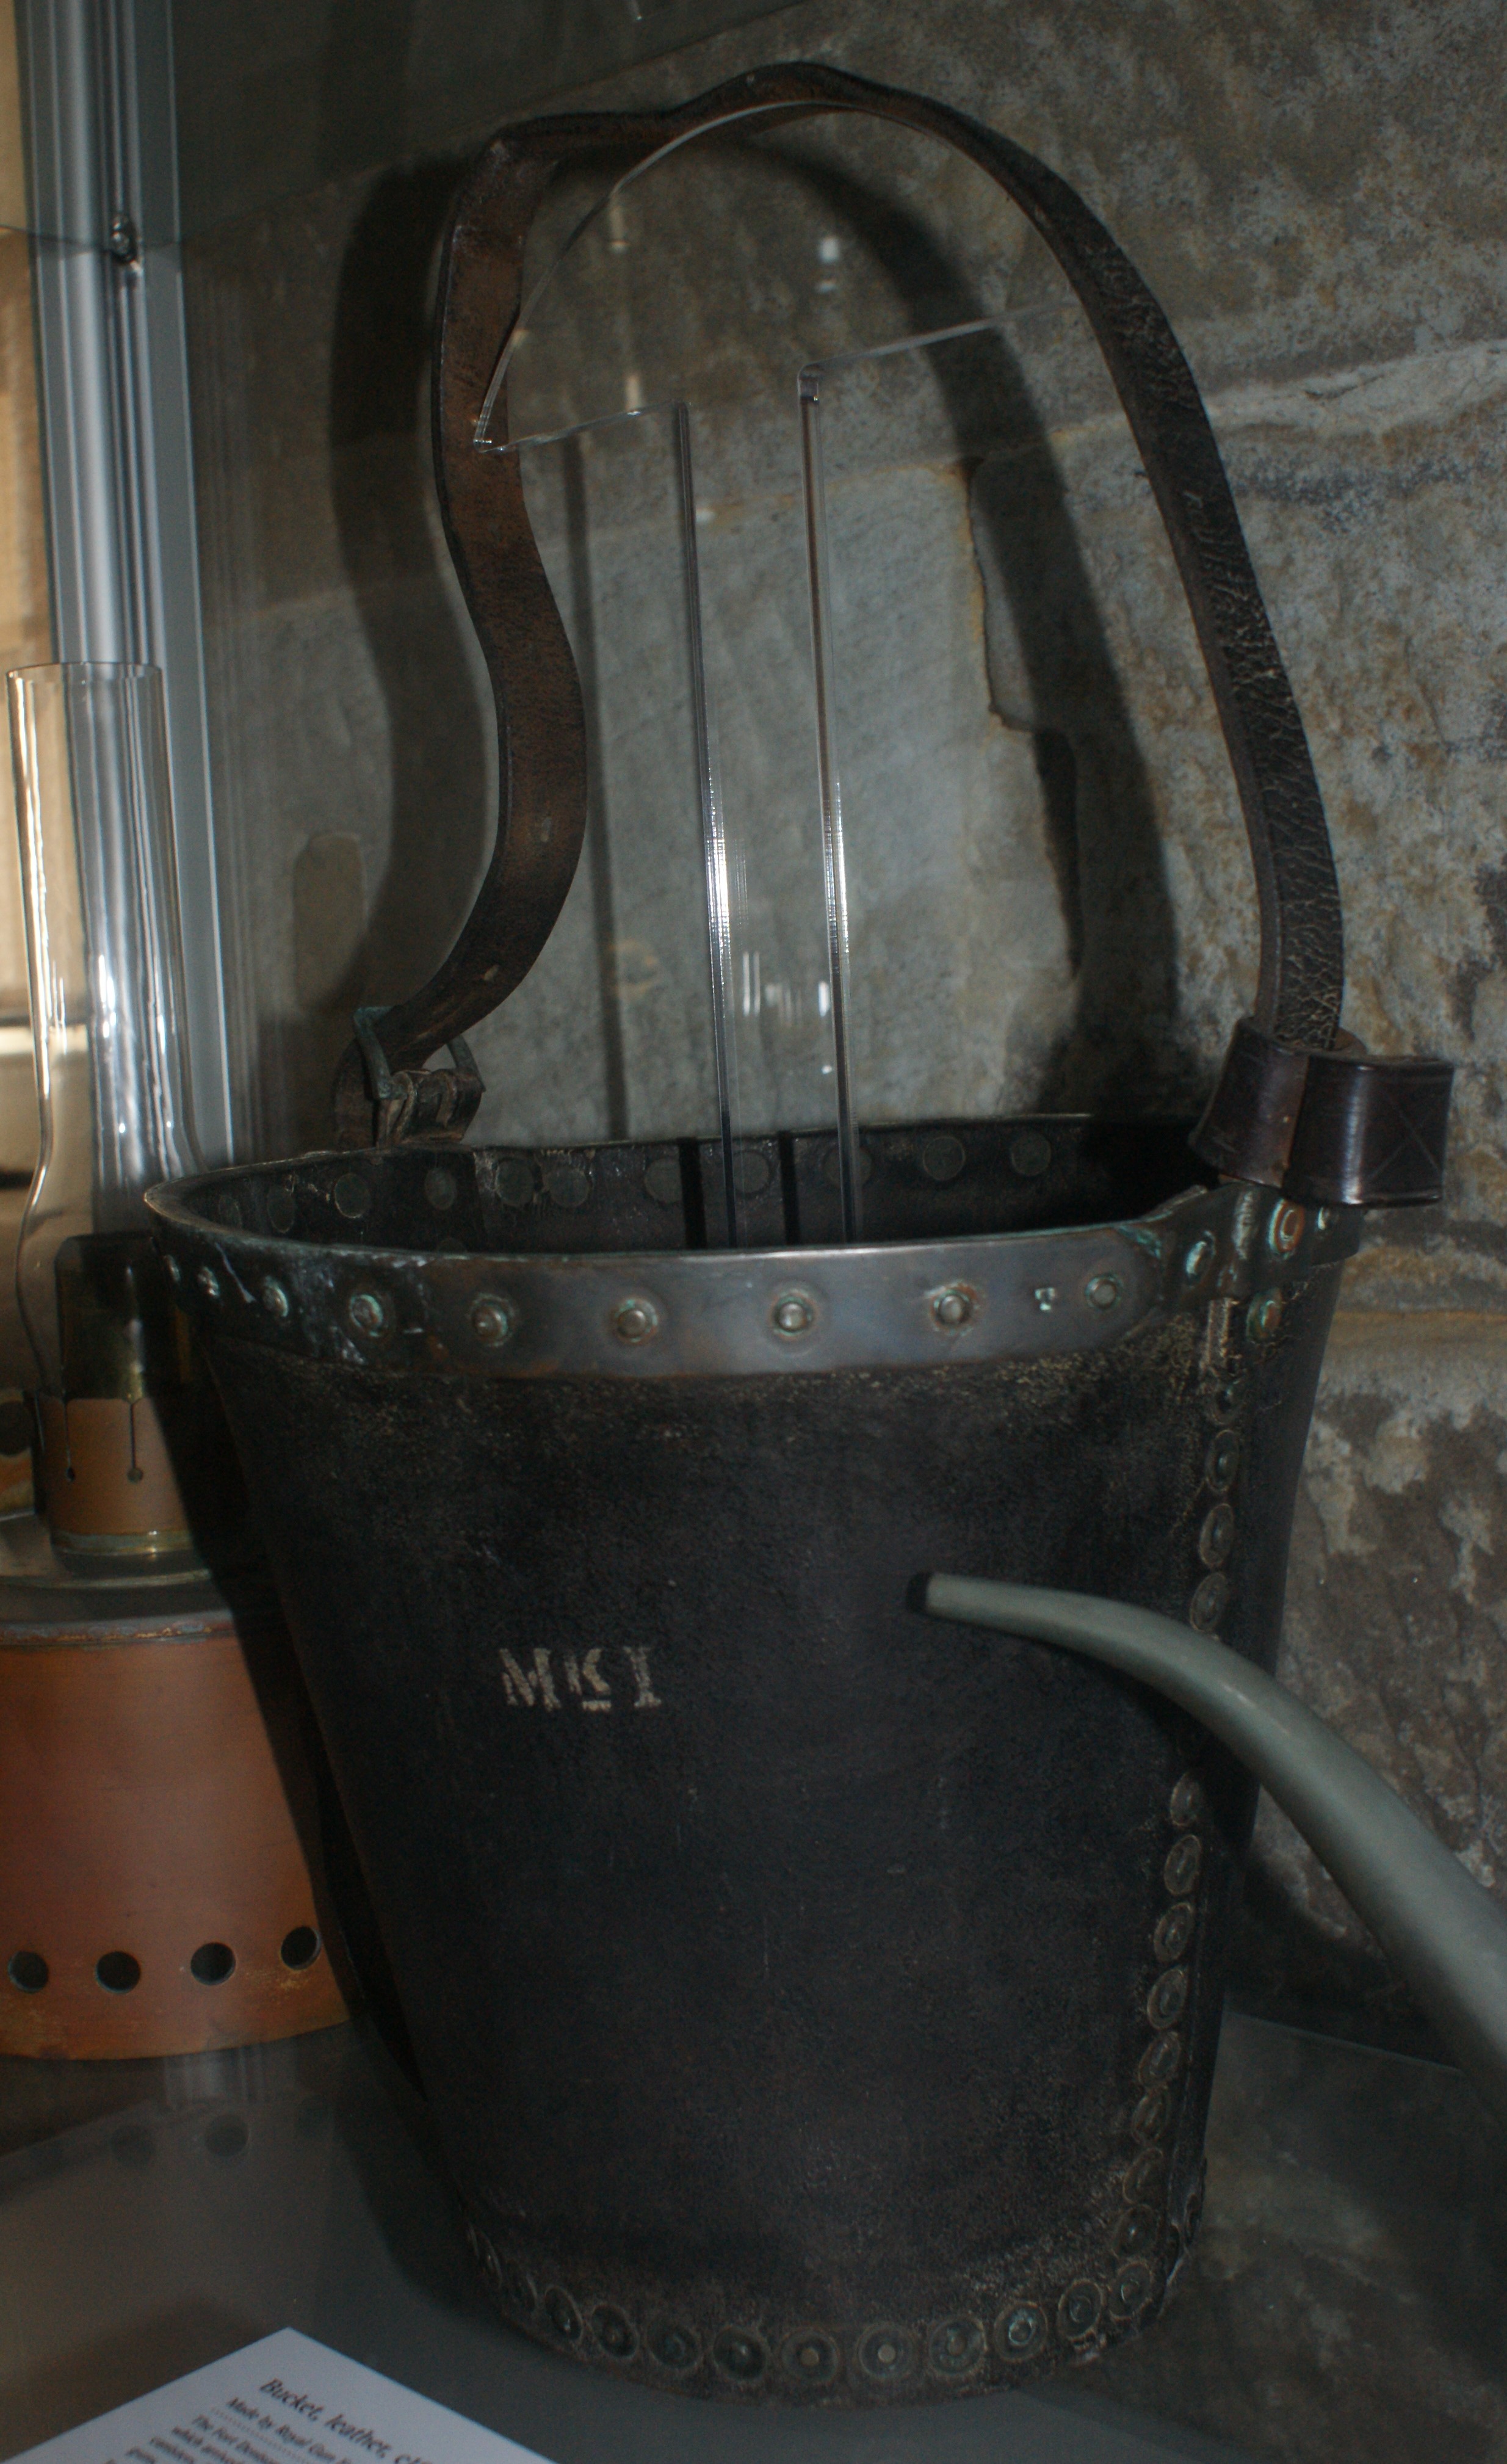
We went on the Japanese mini submarine tour around Sydney Harbour last week, run by the NSW National Parks and Wildlife Service. The tour included a visit to Fort Denison, in the Fort museum was this bucket.
Bucket, leather, c1858 Made by the Royal Gun Factory, Woolwich, England
The Fort Denison collection has three surviving leather buckets, which arrives in the Martello Tower at the same time as the leather canisters. The buckets played an important role in the firing of the guns, as they held the water needed by the spongeman.
To reload the gun after a round had been fired the spongeman took his long spongestaff, wetted the sponge which was on the end of it with water from the bucket, and thrust it down the bore of the gun. This was done to quence any smouldering fragments of power which might have remained in the bore.
Acc Number 2008.54
Firmly dated to the middle of the 19th century, it is almost indistinguishable from the 18th century riveted buckets in Cawdor Castle, Cotehele House and HMS Victory The sewn buckets seem to have stopped in the middle of the 18th century, for example the bucket from the wreck of HMS Invincible (1801) dated 1758.
The main innovation seems to be the use of buckles on the handle to provide some additional flexibility. Here’s some other angles, click on them to embiggen.
This part is really just a quick finish and review of the success or otherwise of the project.
First the hanging straps – we know they are folded leather, sewn with a saddle stitch along one edge. One end loops through the tab on the side and is stitched to itself. Interestingly, I quickly found that the top extension of the tab keeps the hanging strap sitting at the correct angle.
At the top end, we don’t know. We’re missing that bit. It could have been some sort of hook or escutcheon like these from Birka or just about anything. I’ve gone with the safe option and just repeated the loop from the other end of the strap. I don’t know what the width of the belt is that my client will be using, just that he wants the top of the quiver to sit at waist height.
Here’s how it looks:
I’ve borrowed my son’s 28″ arrows for the test, my 32″ monsters are a bit long for this period and type of quiver. There is a little wadded woolen fabric in the bottom to stop the heads marking the leather. I think it helps keep all the arrows at the same height, which is what I prefer. Without it the arrows in the centre would sit lower than the ones around the edge.
SONY DSC
SONY DSC
Now take a quick look back at the Leatherwork from Hedeby post. Having made this one, I’m fairly confident the finds at Hedeby represent two different, but similar quivers. I’ve think I’ve managed to match the shapes and angles of all the pieces, and in all but the outer seams on the carrying tabs, I’ve been able to match the thread impressions, or lack thereof on all pieces. I think there’s a fair chance the carrying tabs had a thin leather wrap around the edges as the originals had stitch holes but no thread impressions.
Here endeth the build. If you are interested, follow my attempt at a quiver from Nydam Mose on my other blog.