I was recently repairing a costrel of Mark Beabey manufacture and started thinking: leather bottels in collections, museums and exhibits around the UK are almost invariably decorated. Those used by re-enactors are mostly plain. I know the commercial manufacturers do this so the more generic item can be used in wider range of periods and hence appeal to the largest posisble market. It is also slightly quicker to make, but results in an impersonal product. On the other hand, the amateur/DIYer often seems to be daunted by the decoration, so avoids it. The result is yours looks much the same as everyone else’s.
I’ve already covered costrel manufacture in chapter 5 of The Reverend’s Big Book of Leather so I’ll show some different techniques and ways of doing the decorating and show some original examples instead of repeating too much.
The decoration, combined with the shape of the holes for the carying strap/cords can be very useful in dating the bottel, but be careful with the claimed country of origin. Some museums, including the V&A and therefore some authors will identify any item primarily decorated with the fleur de lys as being of French origin, regardless of find location, manufacturing techniques or that no similar item has ever been found, depicted or described in France.
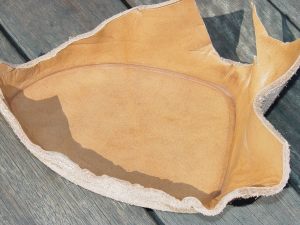
I might quickly revisit forming then ends, as I’ve changed the way I do it since I wrote the BBoL. I’ve taken the way bases for bombards and jacks were made in the 19th century, changed it a bit so it would be unrecognisable to the people who used to do it but is quick and reliable and gives a really clean square edge. It isn’t necessarily correct or even the only way, the late Peter Lee used to start with flat ends, dampen them and mould with his fingers as he stitched. The only mechanical assistance Peter used was a broom handle to form the neck. Peter introduced me to leatherwork so in some small way is responsible for the crap I inflict on your computer screens, but I think my version is a lot more asthetically pleasing and more accurate.
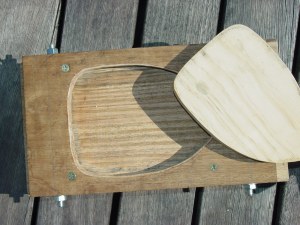
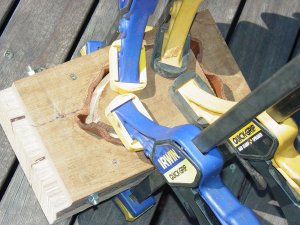
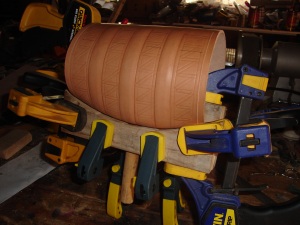
This is the jig I’ve made for shaping the ends. It has a 15mm thick board with the end shape cut out. It has a threaded rod top and bottom to prevent it splitting from the apex or base when I’m tightening the clamps. This board is screwed to a 40mm thick piece of Mountain Ash, which is heavy, stable when wet and resists bending. A piece of softwood cut 5mm smaller on all sides is the clamping piece. The leather is soaked, placed flesh side down on the moulding board and even clamped with the four bar clamps. After a couple of hours in the sun, the clamps are removed and the leather allowed to dry completely before removing from the mould and with the clamping piece still inside as a guide, trim the ends straight.
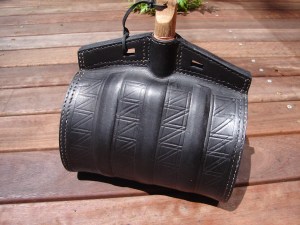
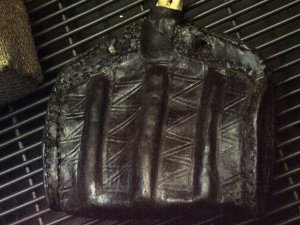
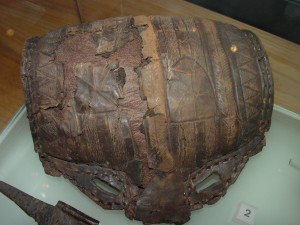
The medieval period examples extant and depicted in various works of art are decorated with usually three, but occasionally five perpendicular ridges. They are purely ornamental and only occur on one side of the botell, the bottom being flat. One ridge is always in the centre and flares out as it reaches the top to be the same width as the mouth. The others are parallel to the end seams and fade out about 25mm from the top seam. Costrels with bands invariably have elongated slots for leather carrying straps. Frequently foliate bands or heraldic shields are incised between the raised bands. Later examples have embossed decoration, again on one side only, the most common being a single large fleur-de-lys in the centre of the front. Pomegranates and Tudor roses also feature. These later bottels commonly have a round hole for the carrying cord.
The idea of an external mould came from a passage from p62 of Waterer’s Leather and the Warrior.
Ornament, usually of a fairly bold character, can also be incorporated in hollow moulds, being carved intaglio so that it stands out in relief on the surface of the finished article…
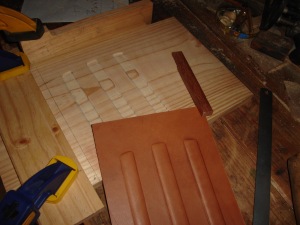
Making the jig and raising the ribs will only add an afternoon to your project, and then you’ll have the jig to make more costrels in the future. Mine’s made from a 300mm wide piece of pine, about 20mm thick. I’ve carved three grooves about 20mm wide and about 40mm apart with the requisite shape. Offset the outside ones to aproximate the curve at the top of the costrel.
The boards clamped on the left and top allow the leather to be positively located and embossed, without having to clamp and mark the leather. The leather was dampened (I want it to stretch in this case) and the bit of silky oak was used to push and stretch the leather into the grooves to form the ribs. Once dry, shields or foliage or any other decoration can be incised or stamped between the ribs.
Shaping the shoulders and neck using another home made jig. I’ve made five or six with this one, the grooves cut to allow the ribs to fit are unnecessary and leave unwanted marks on the leather. I’ll have to take them off before I make my next one.
A copy of Mary Rose find 81A0081, the zig-zag decoration was made with two punches, one the width of the gap between the ridges and the other the length of the diagonal.
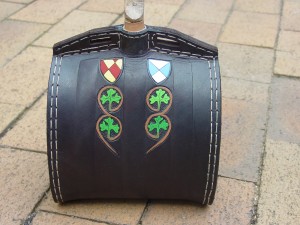
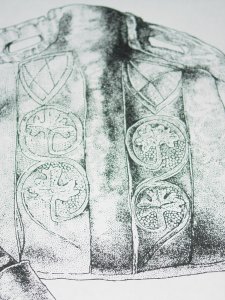
Inspired by Mary Rose 81A2034, the decoration is was copied by enlarging the picture from the dig report to 1:1 scale on a photocopier. Decoration is on both front and back, the small shield on the back has the letter “W” (really V V in 1545) and was carved from a piece of brass round stock. The “W” represents Mary’s monogram Virgo Virginium, and was commonly used for protection.
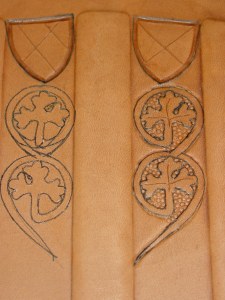
The embossing partially completed. The error on the top left vine leaf was corrected before the outline was cut. The ring decoration was done with a 3mm nail punch.
This one was preserved well enough for me to be able to copy the stitch holes as well. The unusual arrangement of the stitching either side of the neck is original. The stopper is a copy of the one associated in situ with this find. Evidence for painted decoration comes from find 82A5009 from nearby.
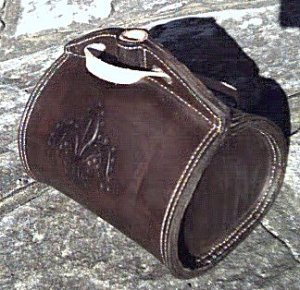
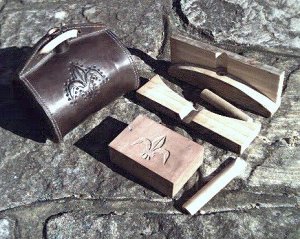
This third example is a scale model of a massive 6 gallon costrel used to collect wine tax from ships in the 16th century. My one holds a couple of litres, roughly half a gallon. The design for the decoration was carved in a block of grey gum and the leather forced in to the patern from behind. I left a vertical mark on the left side when clamping and got upset until I saw the original one had a similar mark in a similar location.
Here’s some examples of original costrels from museums and collections to give you some ideas.

Left hand end of the 15th C costrel in the MoL. The end piece has shed the corrium, so is half to aone third of it’s original thickness.
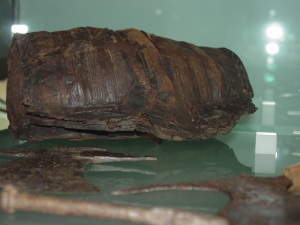
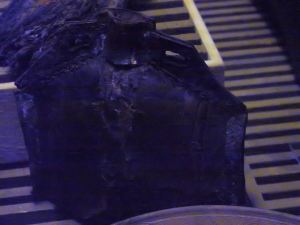
Top view of the 15th C costrel in the MoL. The neck has been crushed and I think the welts are missing but I have been known to be wrong before.
Links
Bunratty Castle: A late 17th century Costrel, or water carrier, leather. Initials B.H. cut into one end. http://www.bunrattycollection.com/search.php?i=146
Bunratty Castle: A late 17th century Costrel, or water carrier. Black leather, slight damage. www.bunrattycollection.com/search.php?i=138
Early 18th century Leather Costrel, punched decoration to the front. 8.5 inches in lenth 7 inches high. Sold recently by Keith Hockin Antiques – The Square – Stow-on-the-Wold – Gloucestershire – GL54 1AF http://www.keithhockin.com/popup.htm?database/images/costrel090309.jpg
Fourteenth century costrel in the Museum of London. This is the full record for the one in my photo above. http://www.museumoflondon.org.uk/English/EventsExhibitions/Permanent/medieval/objects/record.htm?type=object&id=309508
A nicely patched 17th c costrel is depicted on the 7 of spades on the Horner’s Playing Cards released by the Worshipful Company of Horners. Size: 21.5 x 19 cms. http://www.horners.org.uk/pages/Cards.html [dead link, 15/11/2014]
A nice pair of matched 18th century costrels are about a third of the way down the page at http://www.maineantiquedigest.com/stories/?id=1136 A 6″ high example that is dated 1730 and punch decorated in various places with the initials WM and WC, together with a miniature costrel believed to be of similar age.
References
Baker, O., Black Jacks and Leather Bottells, privately printed for W.J. Fieldhouse, Cheltenham 1921
Gardiner, J., Before the Mast – Lide and Death Aboard the Mary Rose, The Mary Rose Trust, 2005
Waterer, J., Leather in Life, Art and Industry, Faber and Faber, London, 1946

Excellent post. Wish I had found this blog earlier,Jenny Baker sent me the link.
Do you sell these costrels?
How can I subscribe/follow this blog?
Regards, Le Loup.
http://woodsrunnersdiary.blogspot.com
Hi, I’ve added RSS links in the menu to the right if you’d like to subscribe. I didn’t bother earlier because I didn’t think anybody would want to subscribe.
Great post.
Do you sell these items?
I have put your link on my blog.
http://woodsrunnersdiary.blogspot.com
Regards, Le Loup.
I make things to stop turning in to an axe murderer. I do occasionally sell items, what are you interested in? What style and period? My waiting list is about three years long, but if I feel like making something in particular I sometimes pick one from the middle of the list.
I was just checking because I know one of our group members & friend needs a new water bottle. If you can give me a price on an early to mid 18thc. costrel I will let him know, but I would imagine that three years might be too long to wait as we go Historical trekking every winter.
Regards, Le Loup.
New England Colonial Living History Group.
Armidale NSW.
Hi,
thanks for the great quality of your blog, every time i come here, i’m amazed.
black hattitude.
I heard somewhere that the leather costrel was actually intended to be carried on the waist belt. What are your thoughts on this, and if this is so, any ideas of how it was secured so it was easily removed?
Regards, Le Loup.
The costrel pictured here has a short leather loop handle that I thread a waist belt through to carry it when I’m on the march. It sits very comfortably on the hip and can be quickly accessed by undoing the belt. Nothing else is on that particular belt. The original the design was copied from was allegedly worn in this manner.
Thanks for the info, much appreciated.
Regards, Le loup.
You know, I thought it was just my photo, but it’s the same with yours. I really don’t see the three layers and the end looks…wierd. The more I looked at it the more I thought it might have been “conserved”. Rather than the corrium splitting and falling away – to me the end piece looks like it’s been filled in with some sort of felt. I have another view where you can see the same brown felty stuff behind some of the cracks and voids in the body. When I looked it up, I note Egan, in The Medieval Household, has it cataloged as “ends missing”. I wonder too now, if the stitching has been re-done in some way – the drawing in Egan shows empty holes and the top not joined together.
I think you are right, it looks like brown felt and the top at least has been sewn with coarse brown thread. I’d assumed that was simply the flesh of the leather showing through where the skin had flaked off. I’m still certain I can see three layers in the end.
Maybe you’re seeing the leather splitting into layers? I got the impression that all they found was the main body – that the ends are missing is stated, and I suppose any “gasket” layer that was or wasn’t would be gone too because the stitching rotted away – you’d expect that if it was linen).
I did hear back from the the MOL – but they didn’t tell me much I hadn’t already learned (from you, Baker, Egan etc.). I sure wish they’d list detail like “oh hey, btw..we kinda messed with it a bit. The stitching and ends were added by us”. I don’t know if you’re familiar with 14th/15th century clothing finds from Greenland – but they did some odd things to them (like glueing them to mesh) as a conserveration method – methods frowned upon today.
We have purchased an antique all leather bottle here in the US very similar to a costrel. We have been unable to identify the age or origin with an internet search. I would like to send you some pictures to see if you might be able to assist us with determining its possible age and origin.
Thank you
Jeff
No promises, but I’ll have a crack. I’ll send you my email privately.
Hi Jeff. Can we get to see these photos too please?
Regards, Le Loup.
Keith, Jeff’s photos are here. Cheers, Wayne
Pingback: MOL Costrel – Molds and Testing « sevenstarwheel
Hi Reverend,
Just managed to catch up with the post you made back in oct. last year about the costrels you have made – very nice pieces from what i could see in the pics you posted. I’m abit pushed for time time right now, but would love to communicate more on the subject of leather vessels in general – I’ve been makkng some decorated vessels lately using “cuir boulli” techniques- might be of interest?? Cheers for now,
Mark B.
Hi Reverend,
Just managed to catch up with your post about the costrels you have been researching and making – very nice pieces by the way. The images you have got of the MoL stuff are really informative (didn’t even know they were there!!). I like what you have done with the raised moulds for decorating the surfaces of the costrels. They seemed to keep their shape well after the lining process. I haven’t made too many vessels of late (too many boots keep getting in the way!), although I did do some pieces recently using “cuir boulli” techniques to get raised surface decoration – got some piccies if you are interested?
Taa raa fer now
Hi Mark, I’d be very interested in discussing that with you. I’ve been looking at cuir boulli to do the decoration on inkwells and similar. My only experience with the technique so far has been a leather faced buckler for fencing school.
Cheers,
Wayne
Just stopped by to let you know I am still here and see if you have anything new for 2010.
Did you get any feedback on Jeff’s unidentified bottle?
Take care.
Regards, Le Loup.
Hi Keith,
Nothing of any consequence so far, and no leads on Jeff’s bottle.
Wayne
Wow! I am so glad to find this site and blog. I have been doing a LOT of research on pre-seventeenth leather bottles. I’ve even managed to make 2 bottles: a costrel and a bottle inspired by extant Tudor bottles from the Mary Roses. I shaped both of these bottles with sand and used the cuir bouilli method that I thought closest to the ones that bottle makers of the period would have used based on my research from Oliver Baker and others.
While we will probably never know for sure all the processes and steps they took to create these beautiful bottles, I am striving as a historical reenactor and artist to get as close as possible. Unfortunately the steps of the wooden mold method elude me so I was really excited to see the solutions you have come up with. I was inspired and adapted your rib mold to make my bottle.
Meanwhile I’m still searching for period primary documentation of bottle molds so if anyone can direct me toward this goal I would really appreciate it. I’m in correspondence with a couple of different curators from some of the British museums and hope that this leads to the elusive, definitive answer. One can always hope:)
I look forward to learning from such knowledgable folks as you all. Thanks for sharing your work. It’s all beautiful and I’m in awe of your skills.
By the way, I’ve poured of Before the Mast for many hours and appreciate the detailed archaelogical drawings but I would love to see more like the really detail one that was posted with the photos of your molds. Where did you find those drawings, please?
Thanks,
M_
Hi, thanks for the nice comments. The picture is from The Story of the Mary Rose by Ernle Bradford (Hamish Hamilton Ltd, 1982).
Baker is great, there’s the picture of the jack moulds towards the back with the iron rings that were used to form the bases, I’ll do a post on that sometime soon.
I’m an engineer by training and inclination, my methods are largely conjecture to get the result we see sitting on the shelf in museums and I’d like to pretend I come somewhere close. There’s any number of alternate methods that could be equally (or more) correct. I must admit to being firmly in the not-sand moulded camp, much for the same reasons you outline above.
I haven’t seen any pre-19th century documentation on construction but I’d love to see any you find. The trade guilds may be a good place to try, I haven’t corresponded with anyone from the bottlers guild, but found some good information from the fletchers on another matter.
Wayne
I found the Bradford book at one of our local libraries and I’m already pouring over it.
I’m an artist and art educator by profession but my second major in my undergrad program was anthropology/archaeology and I actually started grad school in archaeology before deciding that art ed was where I needed to be. I feed my inner archaeologist through research as a historical reenactor. My husband shares my love of things pre-seventeenth century and is a very fine brewer of both contemporary and historic beers and meads.
I’ve just gotten another book through inter-library loan. This one is one of Waterer’s books. I’m hoping that there may be clues to documenting the mould method of bottle construction in it, but I’m not holding my breath. I’m beginning to think that there may not be any primary documentation available. I think I am going to contact the guild and see what I can find there. I’ve already been in correspondence with Phil Qualington and he didn’t know of any proof, even though he’s had years of training with the cordwainers in England.
The continuing lack of evidence supports my theory that the moulds may have been the exception and not the rule. I’m pro-sand but look forward to being proven wrong.
As for the jack moulds in Baker, I seem to remember that he didn’t know a date for them. He doesn’t explain how they were used but on close inspection of his drawings one can see that the rings are doubled, similar to embroidery hoops. That configuration would work very well for shaping the bottoms of jacks and I look forward to trying it one day, but for now my focus in on Tudor bottles.
I’ll keep you all posted if I find anything I think may be helpful for those who may be looking for period evidence.
M_
The thing with Baker is that the details are spread throughout the book. On p184, under Makers’ Marks, he says
On p185, Ornamental Stamps, he repeats the statement about the block. The next bit is interesting:
He then goes on to discuss fleur de lis and hearts raised in relief by this method.
The problem is that the described method would not achieve the clarity of outline on the raised design that wa can see in the photographs. I suspect Mr Baker had met someone who had worked at Messrs Merrywether’s factory where jacks were still being produced in the mid ninteenth century and then, having seen the blocks jacks were made on, extrapolated the method to bottles. My costrels are all stamped and otherwise decorated while flat, demonstrating that there is another way to get the observed result.
What I hope is a quick question. When making the costrel with designs (ribs and say shields or patterns between ribs) involves three (3) rounds of casing the leather.
round #1 – casing leather to render malleable for formers to make the ribs
round #2 – casing the leather (but not as thoroughly as in #1) to work a design into the leather either incising or stamping
round #3 – casing the leather to put into the former to close the costrel and form the neck
In round #1 it seems that to work one would soak leather until bubbles stop forming, in #2 just enough moisture in the area to be carved/stamped to perform that work. In #3 are only the ends placed in the former cases, or is the entire piece of leather cased?
Again, you have fantastic information here, and my period hobby work has improved immensely. For that you have my thanks!
John
Hi John,
That’s more or less right. Round 1 is soaked, round 2 is done while still cool/damp from round 1 using the spray bottle we also use for ironing to add any moisture to the spots where it’s needed and round 3 is only the two ends. It usually takes so little time to so round 1 and 2 that round 3 only needs a little dampening, again with the ironing spray before clamping.
Wayne
I’m going to work on the 13th/21st century French castle of Guedelon in early September and would like to purchase a Medieval water bottle. Do you have one for sale? Or are you still on a 3 year delivery!? Excellent blog BTW.
Hi James,
Thanks for the feedback. I don’t have any stock for sale and there are two bottles and a quiver in the queue at the moment. Shortest possible time would be 3 months before I can start and then a month after that to finish. Life has a habit of getting in the way. Are you after a particular a particular shape or style? What period and strata of society would it be for?
Wayne
Hello Wayne, it has to be 13th century for a building labourer so something plain is needed. Do you know of any readily-available source of something that could pass for 13th century? The French castle project can be seen here: http://www.guedelon.fr
Thanks, James
Hi James,
I’ve been subscribing to the Reverends top leatherworking blog for a while now – and find it all very interesting and fully intend to make a proper contribution with a few images and practical insights of my own some time soon. As the Rev himself says, life just has a way of getting between the most well intentioned of projects and plans! Even after more than 20 years in the historic leatherworking game I’m still crap at estimating how long some projects take to come to fruition. I’m not wanting to hijack anyone elses efforts here, but if the Reverend is okay about it you are welcome to give a me a call on 0046 495 22060, or email me direct at bjarnisboots@mac.com and I might have a leather vessel on the shelf that fits the bill.
Cheers for now,
Mark Beabey
Hi Mark, Hi James,
I’m fine with that proposal. Mark’s work is high quality and his costrels would suit a 13th century labourer well.
Thanks for the link to the castle project, I’ve been keeping an eye on it an the one in America. If you ever want to build one in Australia, count me in. Most of the attempts at medieval style building here have either bowed to Hollywood cliches or been underfunded and taken too many shortcuts to keep the cost down. In the defence of the local building industry, the company who did the heavy framing of the Globe reconstruction were based about a two blocks from home.
Mark, it would be great to hear your experiences and insights.
Cheers,
Wayne
Hi Rev,
Thanks for being cool about me “hijacking” the post. I promise I will post up some details on my methods for making vessels, although you have covered the subject pretty thoroughly yourself. Maybe I’m just being thick but I couldn’t see a link for attaching images to a thread comment?? I think I need some advice on using your site!
Taa raa fer now,
Mark B.
Hi Mark,
It doesn’t look like WordPress supports images in comments. The options are that you email them to me and I upload them or I set you up as a contributor on the blog.
Cheers
Wayne
Pingback: Turkish Leather Bottles (taken from Varangian Voice) « The Reverend's Big Blog of Leather
Pingback: Mary Rose Costrel 81A5749 « The Reverend's Big Blog of Leather
I was wondering if I could get more detail on the jigs you are using. I am part of a historic group (SCA) and would like to recreate the costrel from the Mary Rose. I made one several years ago but used sand. I know this was not the correct way so I gave up. That is until I found your Blog. Thanks in advance for any help.
Hi Frank,
I’ve covered the jigs I use in a couple of posts, a general one on costrel making and some more specific ones about some of the Mary Rose costrels. I also have some more information here.
Holly has done some great work on costrels and bottels as well.
We don’t know for sure that sand was definitely wrong, although there’s a fair bet blow moulding is nothing more than a fantasy by an academic somewhere. The wooden jigs allow me to get results that look closer to the originals than I can otherwise manage. I still can’t get the curve between the base of neck and the body of the costrel smooth at the front, so I’m still learning just like the rest of us here. Let us know how you get on.
Wayne
Hello Wayne!
Good Lord but look what came up for sale last month:
http://www.catalogue-host.co.uk/simonchorley/2012-10-10/lot_786
Didn’t sell either, do you have 10,000 pounds or so you don’t know what to do with?
Cheers,
Holly
Hi Holly,
Oh wow, that’s The Bottel! I’m sure I must have a lazy 10,000 quid around somewhere. I’ll check my other trousers. Hmm, I did a much nicer job of the stamping on the left, I never do it rough enough to match the originals.
Sadly, no. Not even in my Fighting Trousers. There’s a second row of stitching along the top.
Interesting response from the MRT:
Peter Crossman
Hello Mike
Your enquiry regarding the leather costrel 81a0881 has been passed on to me.
The flask is 20cm wide, 5 cm deep front to back (although slightly crushed so may have been more), and has a maximum height of 18cm to the top of the neck. It’s approximately 15cm to the base of the neck. It’s also 17cm wide between the inner stitch lines on the front/back.
Hope that helps
Best regards
Peter
Any thoughts, Rev, on how wide it would be, uncrushed?
Hi Mike,
The crushing is almost all in the thickness, rather than the width so I’d say it would still be about 20cm. Looking at the line drawing in Before the Mast, the design stops about 2cm higher than I’d expect it to on the front and back. This leads me to think that the probable thickness would be between the 6cm of 81A1214 and 8cm of 82A5009, if I had to pick a number, I’d say 6cm and a bit. The extra 4cm of blank space is on a curve, so divide by pi and add the result to the current thickness as a rough approximation of the diameter of the base.
All the depths are measured at the thickest point, which is in the middle below the neck.
Wayne
Thanks, Rev. It was the thickness I meant.
That means that the jig for the end pieces must be pretty small, more so if welts are used.
Mike
Pingback: The Stonyhurst Gospel | The Reverend's Big Blog of Leather
Pingback: Black jacks, part 2 | The Reverend's Big Blog of Leather
Pingback: Hedeby Quiver – part the third | The Reverend's Big Blog of Leather
Pingback: Continuing on with Costrels, Cordwaining, and 6th Grade Leatherworking Lessons… – School of the Renaissance Artisan